Prerequisites #
- You should have a Presto Assistant organization set up.
- Need to set up an organization? This article will show you how.
- You should have data in a file using the "Comma-separated Values" CSV format. This could be data that you have exported from a tool like Google Sheets, Microsoft Excel, or others.
- If you are importing data with "Checked Out To" information, make sure that your student data is already in the system.
- Need to import student data? Follow the steps in this article.
Getting Started #
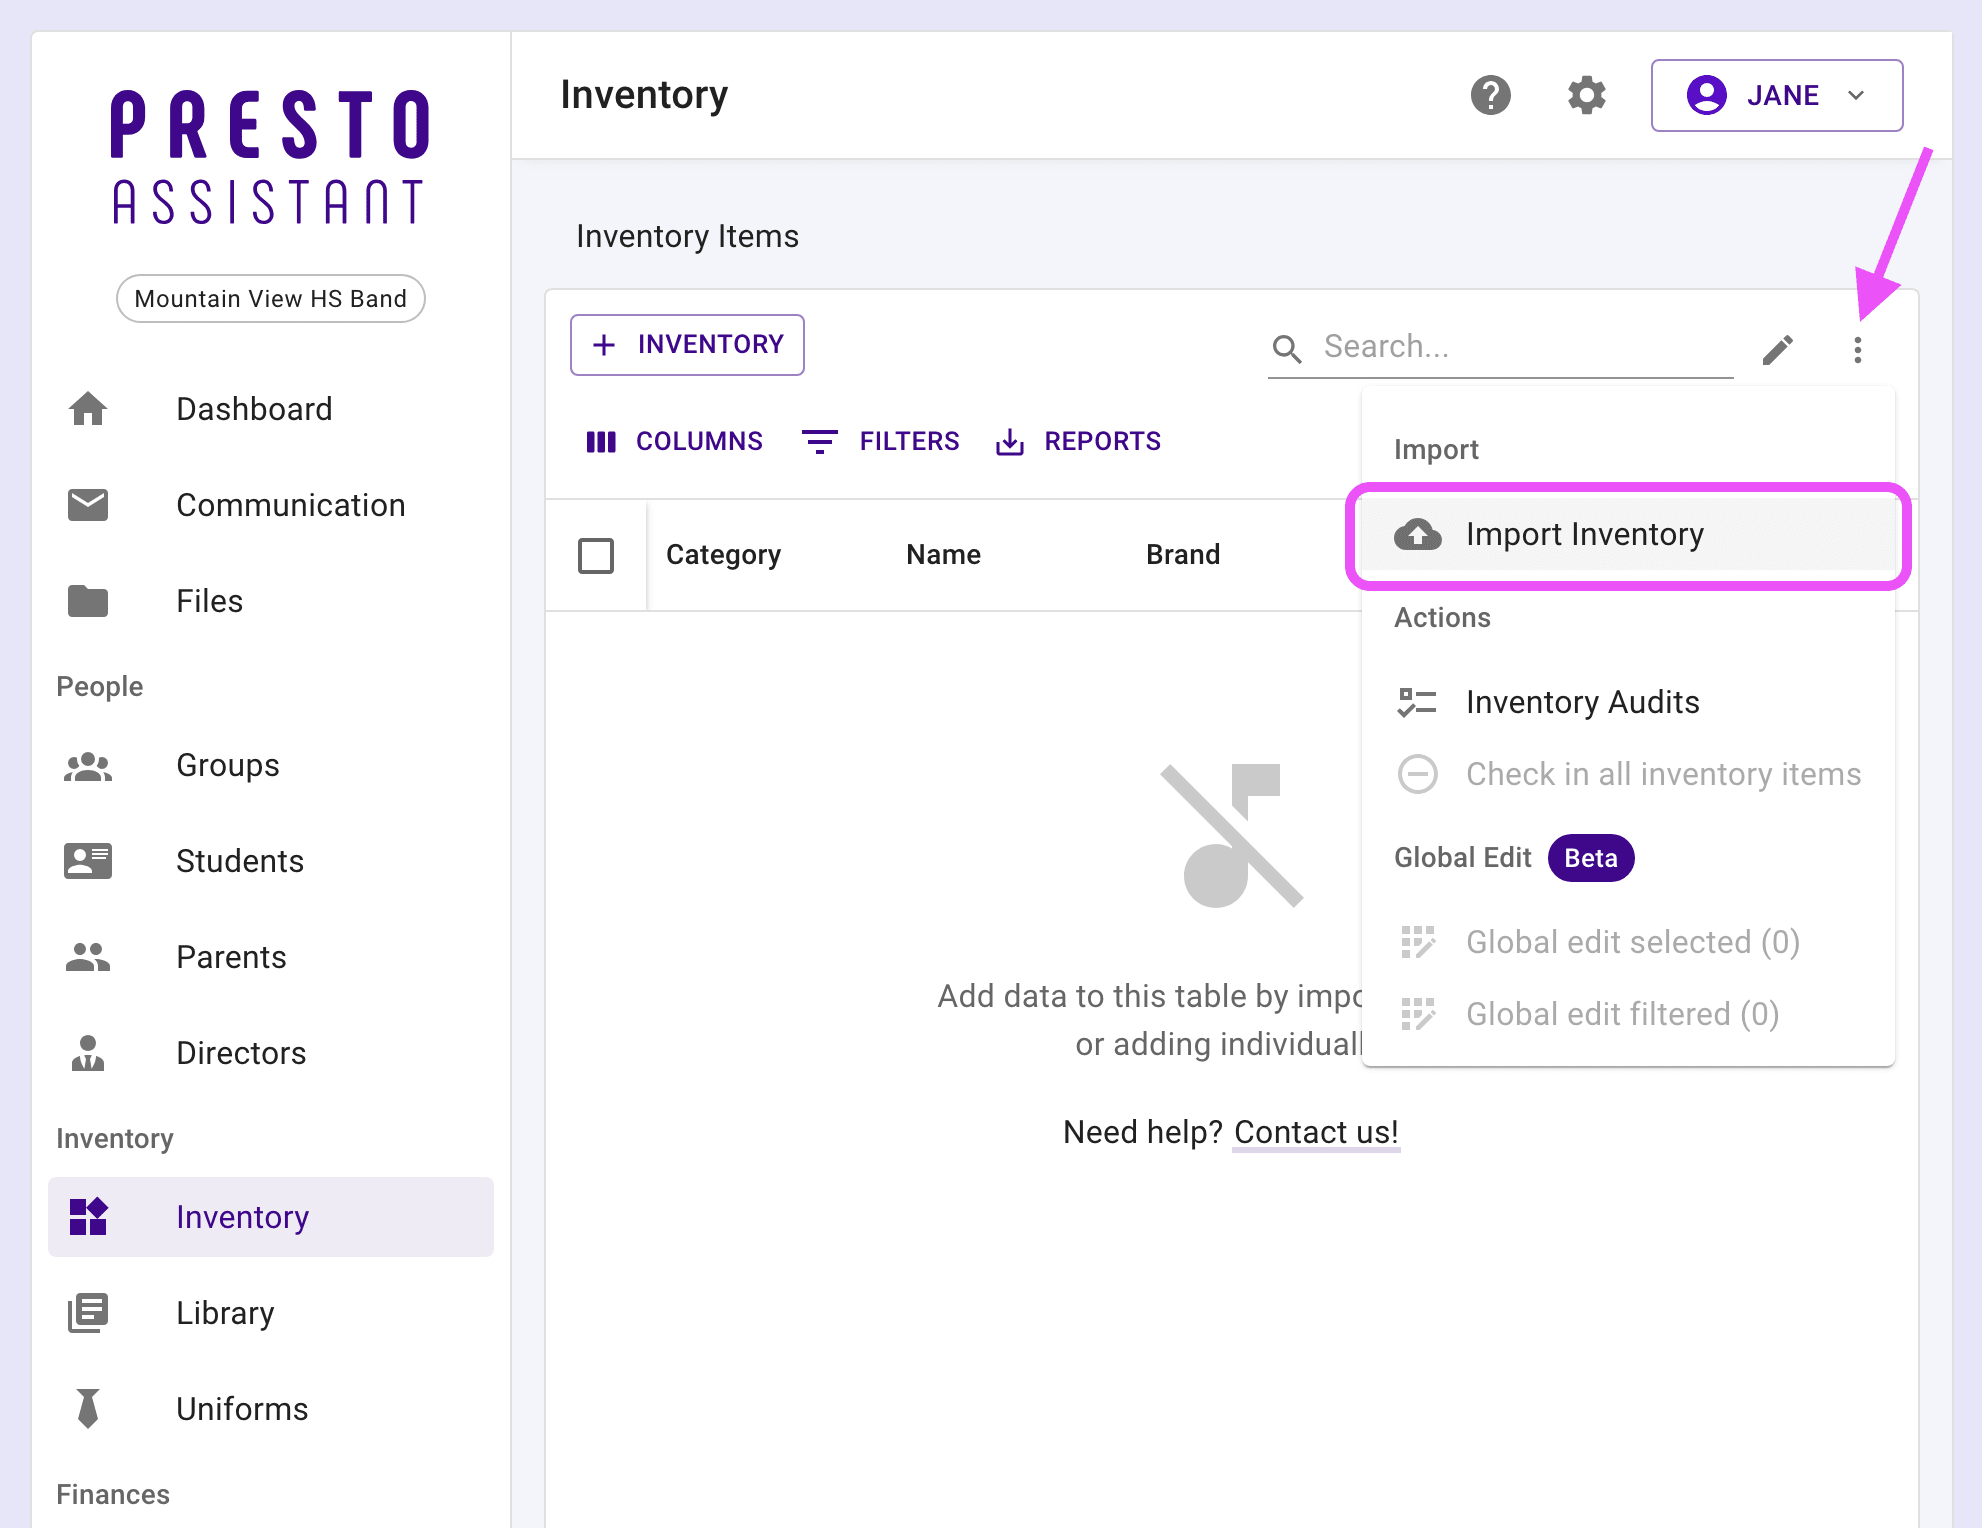
- From the Dashboard, click the Inventory item in the left navigation menu.

- Click the triple-dot "More Actions" icon button at the top right of the table. Press the Import Inventory option.
Three Import Options #
Choose one of our three options to add large amounts of data to the Presto Assistant system.
- Use the Presto Assistant template
- Use your own CSV file
- Send your data files to Team Presto
Use Our Template #
Transfer your data to the template that comes with all Presto column headers. Import that file into Presto Assistant.
Download the template file and move your data over to this new file.
- The template file will have all of the column headers for your organization, both REQUIRED and OPTIONAL.
- You will also see column headers for Dynamic Fields if these are used by your organization.
Drop the updated template CSV file onto the cloud icon.

- Head to the Preview and Finish Importing section below.
Use Your Own File #
Make sure your CSV file has the correct column headers, and import it into Presto Assistant.
Open the target CSV file that contains your data.
- We suggest that you make a copy of your data since you'll be updating that CSV file directly.
- If you have a file in another format like XLS, use your spreadsheet program to export the data to "Comma-separated Values" (CSV) format for use with Presto.
In Presto, press the arrow next to "Option 2"
Adjust your CSV file to use the Presto Assistant column headers format.
- Capitalization and spacing doesn't matter for these fields. Our system will treat "serial Number" and "SerialNumber" the same way.
Remove any extra columns and save the file.
Drop the updated CSV file onto the cloud icon.
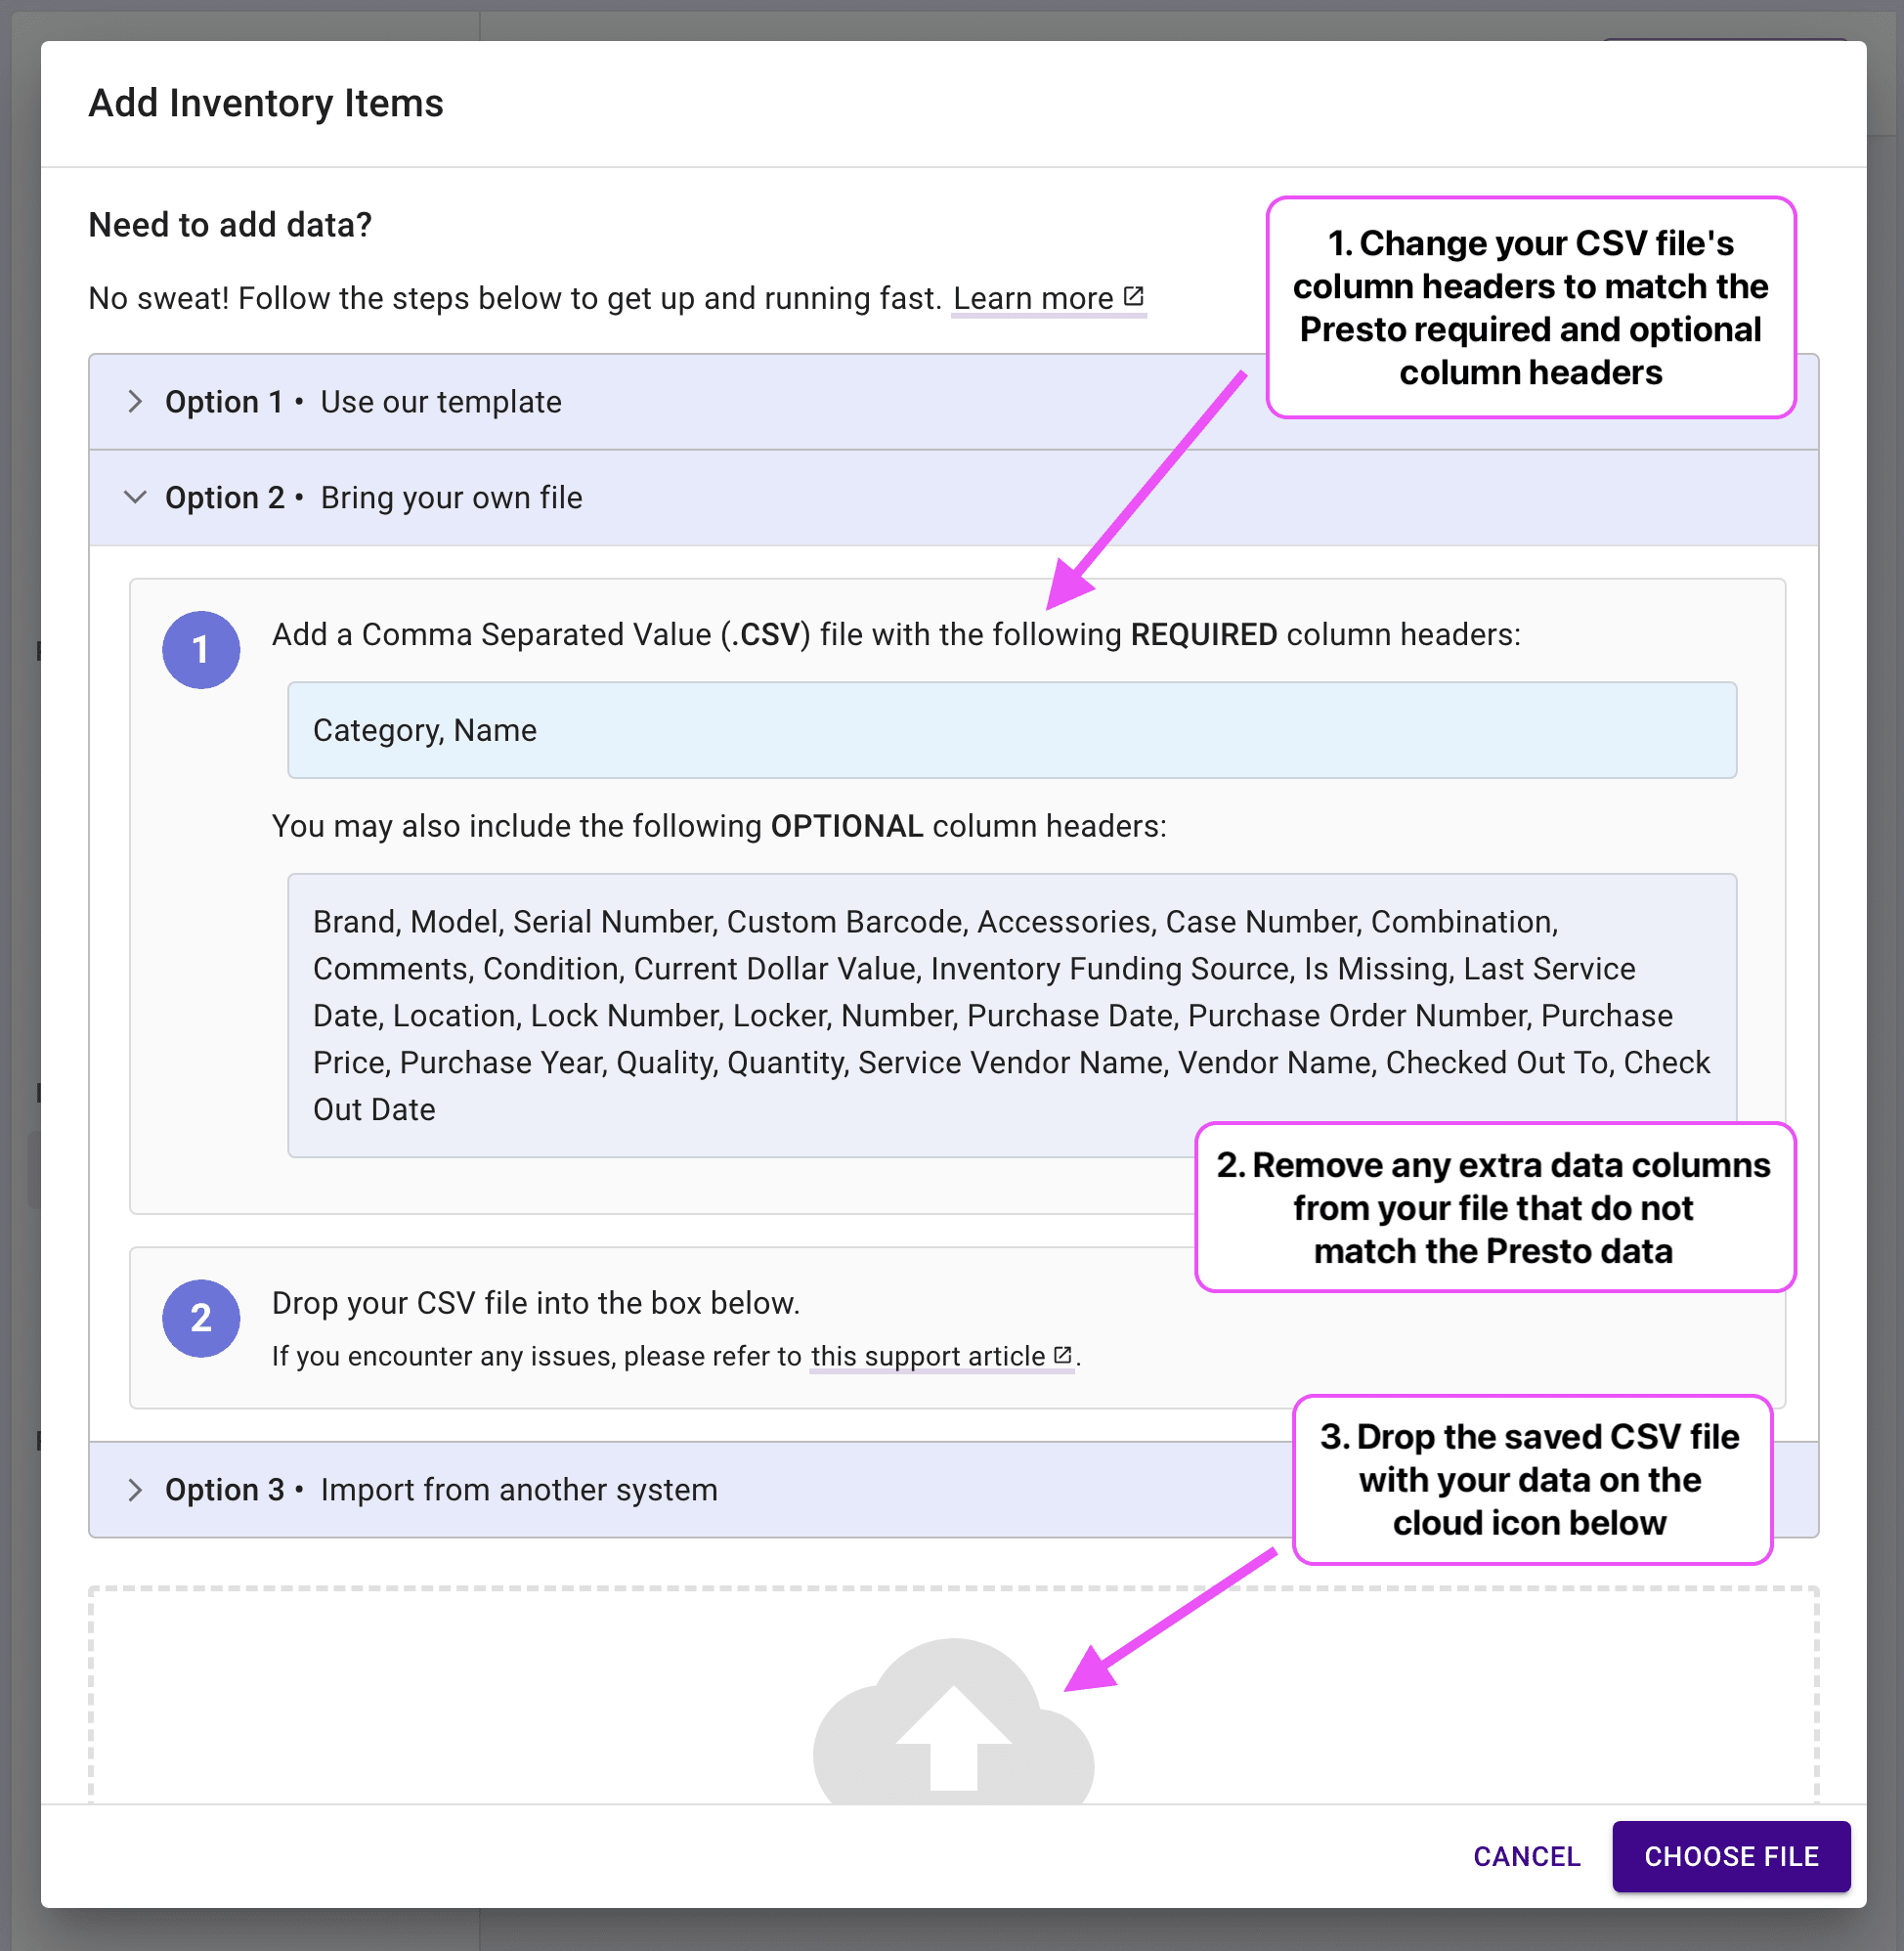
- Head to the Preview and Finish Importing section below.
Import From Another System #
The EASY button — We can migrate your data for you, up to a week turnaround depending on the time of the year.
Export your data from the old system into a CSV file.
In Presto, press the arrow next to "Option 3"
Select which system you are migrating from and drop your CSV file onto the cloud icon.
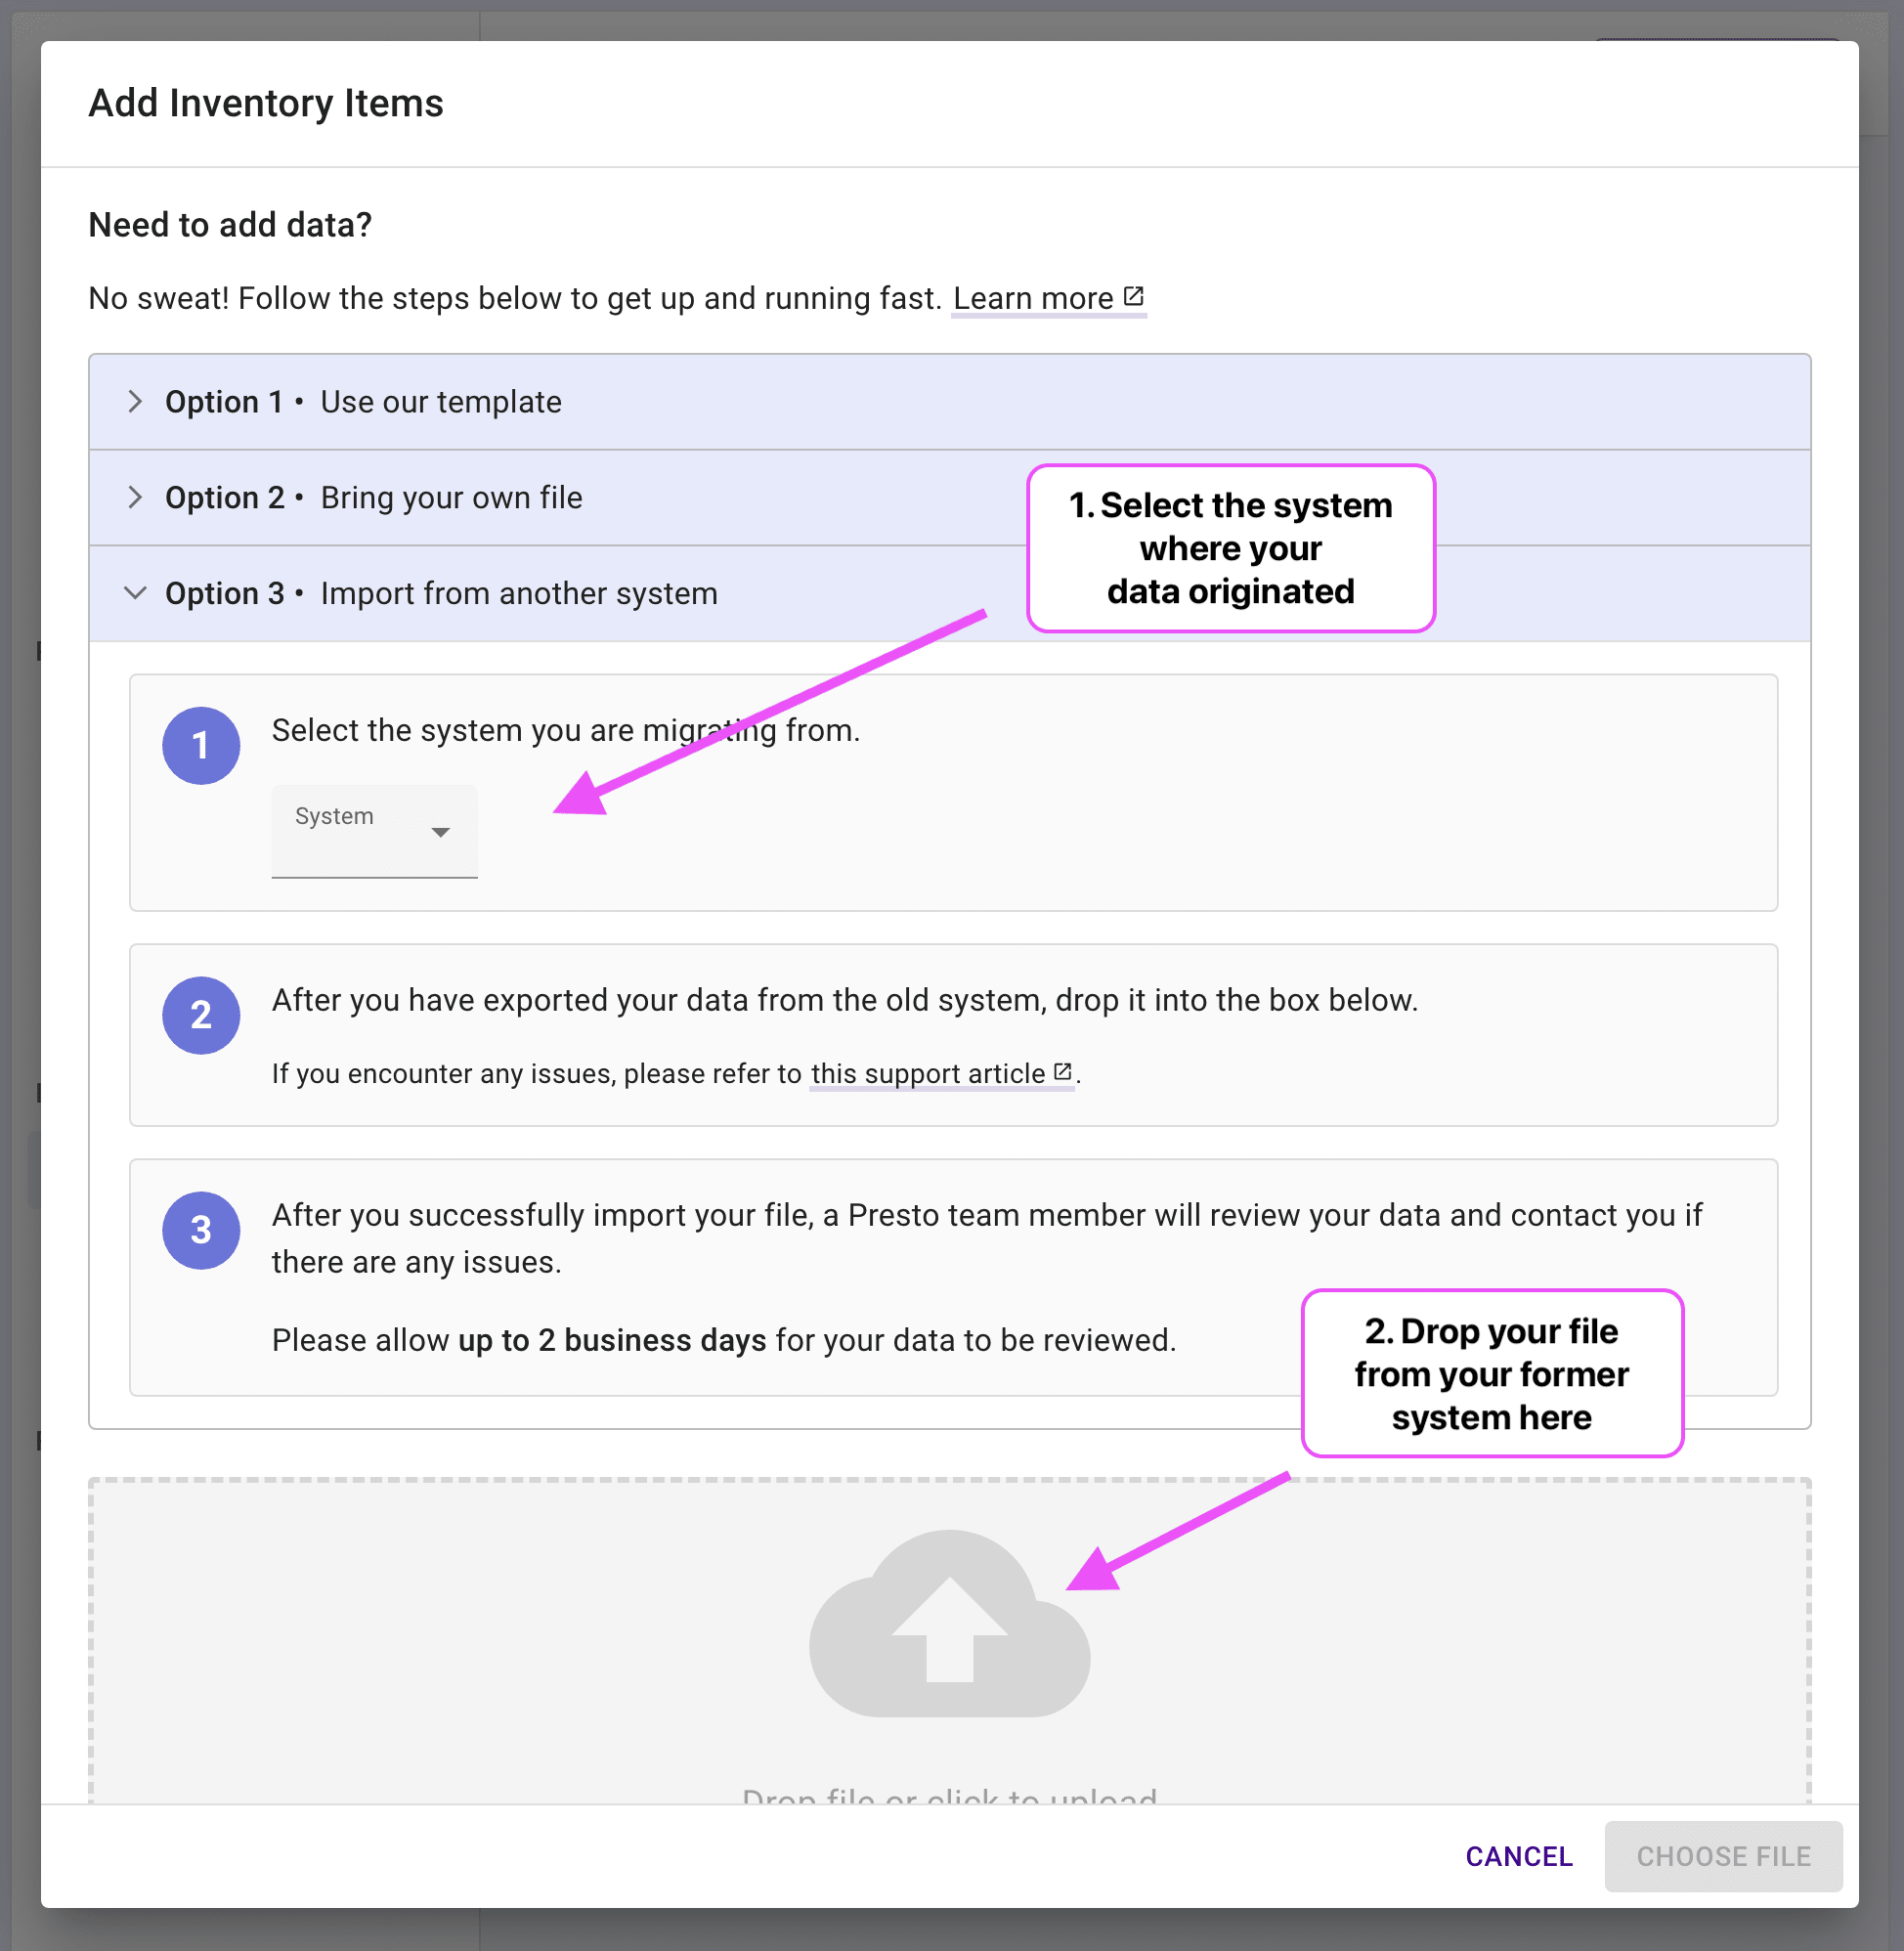
Team Presto will take care of the rest. We will be in touch with any questions or to let you know we are done!
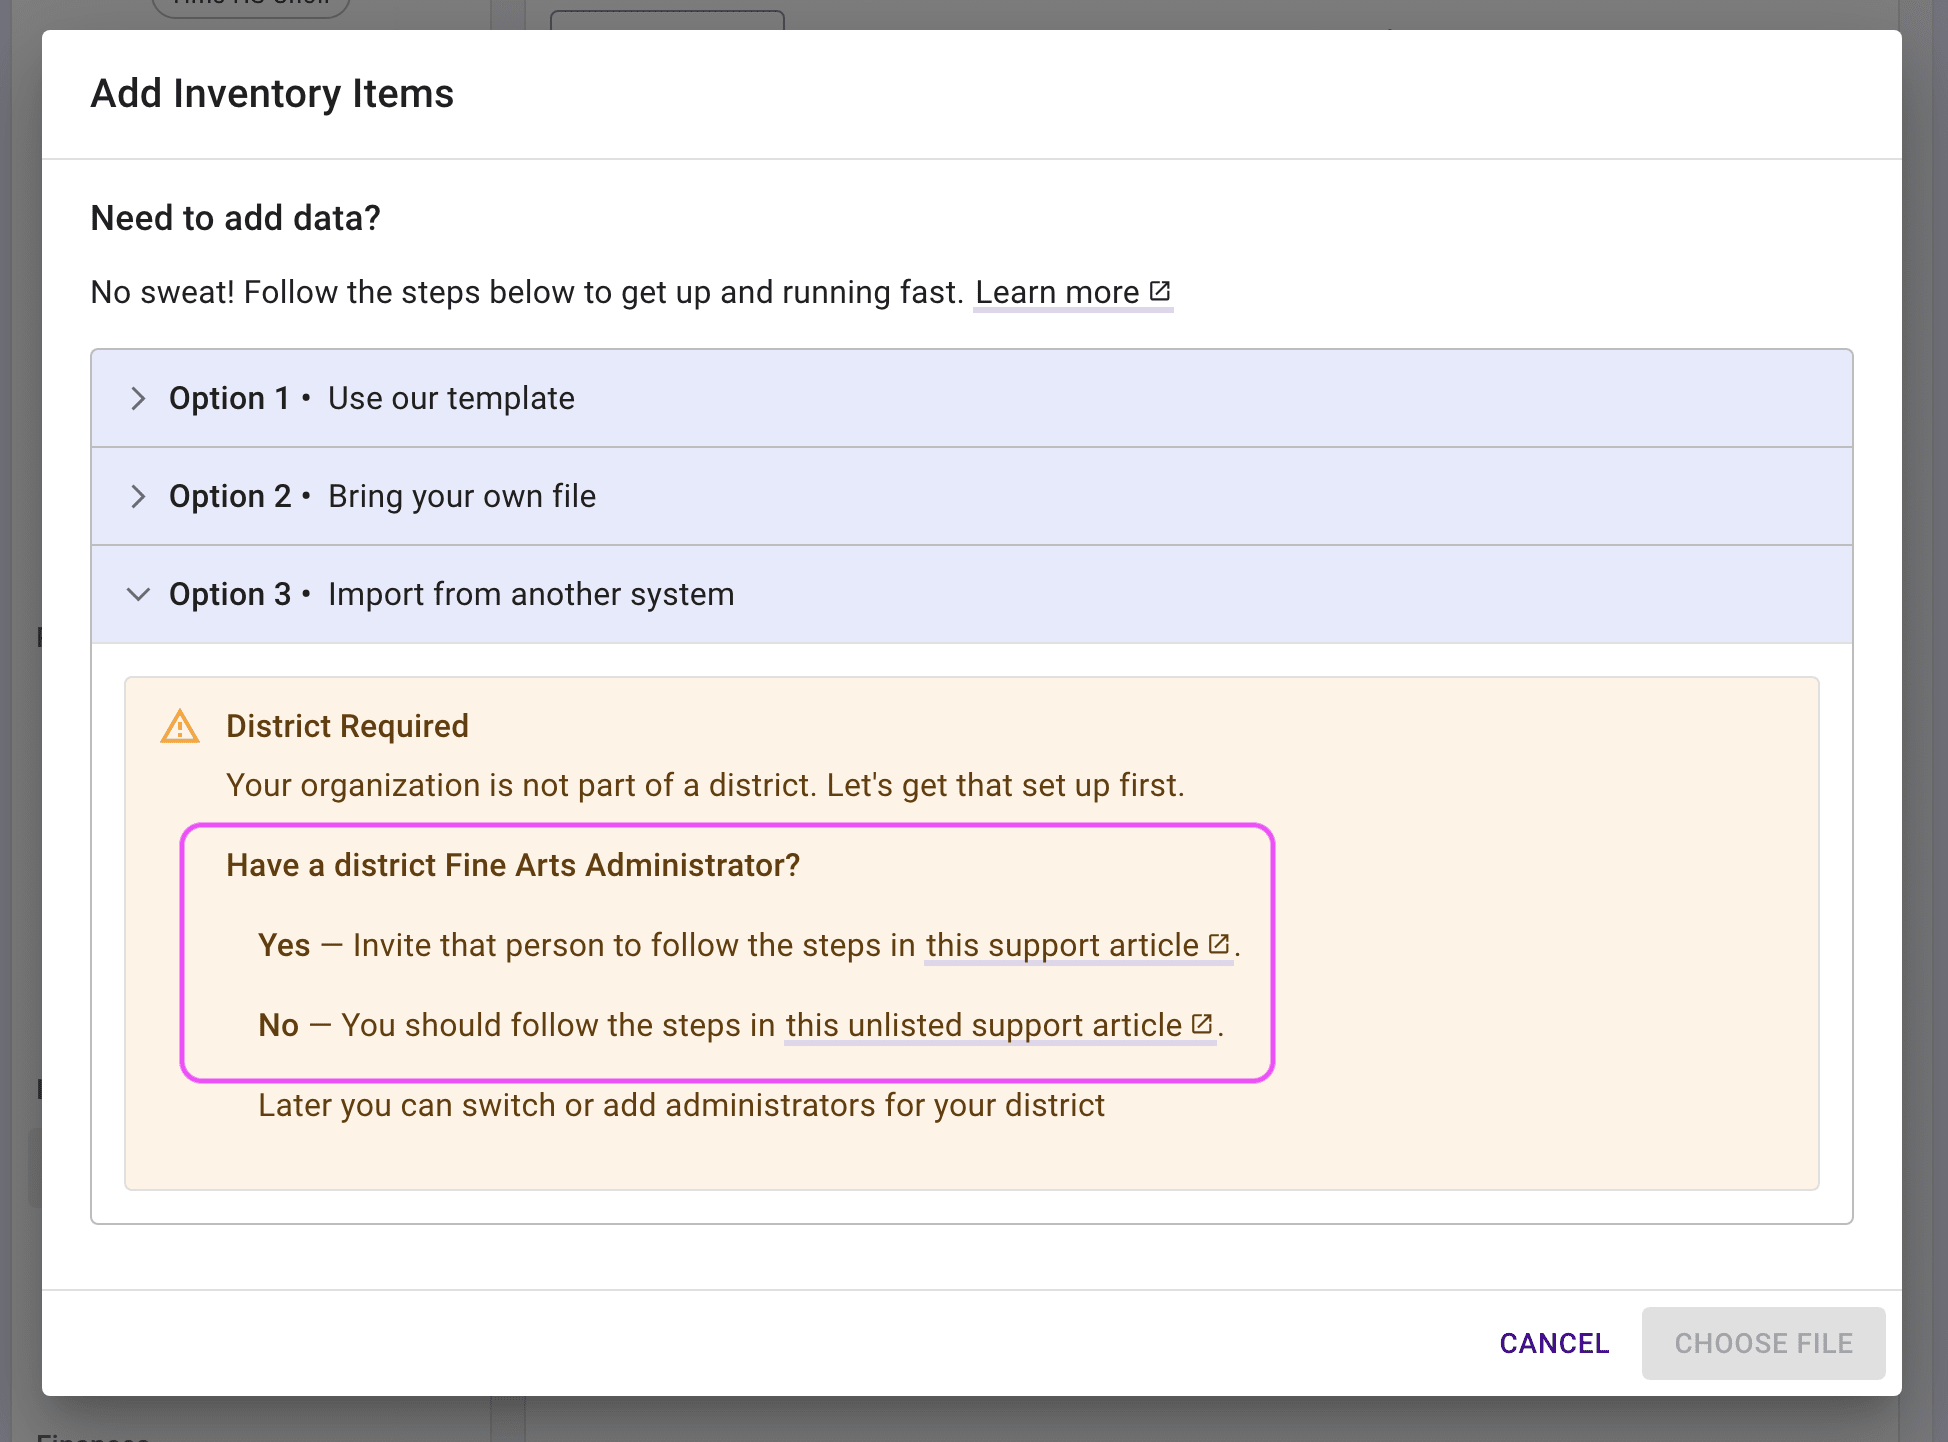
Tip
Option 3 requires that your organization is connected to an Admin Portal.
Preview and Finish Importing #
- The last step of the import process will show you a preview of the "good" and "bad" rows that we detect (pictured below). This is a chance to correct any issues like missing “required” fields in some rows.
- The preview only shows 10 rows of data.
- If bad rows are present, you can still import the rest of the data. The system will ignore the bad rows.
- See the Troubleshooting section below for more help.
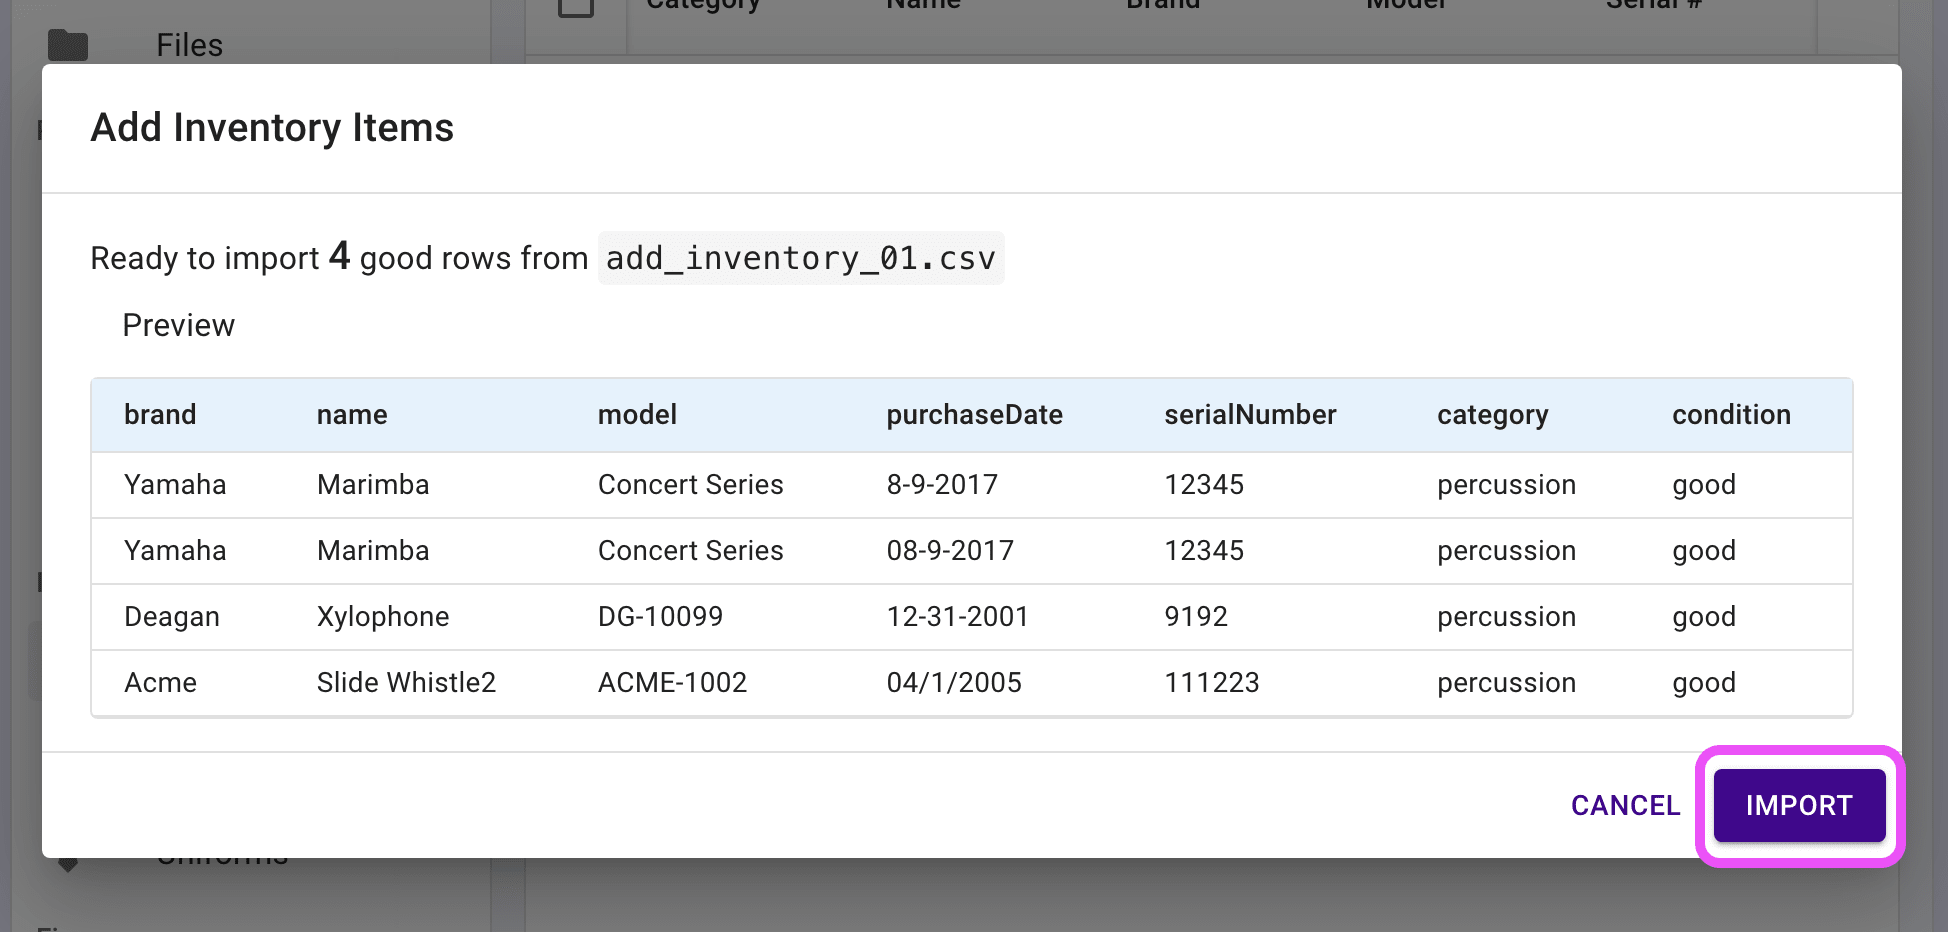
If all data looks good, then press the purple Import button. Your data will be available in the system within a few seconds. Presto means FAST!
Data Types #
When you import a CSV into Presto Assistant, each column must contain data in a format that Presto can understand. This section explains what each field expects, including which fields are required, which are optional, and the specific type of value that belongs in each one (text, number, date, allowed values, etc.).
Think of this as your reference guide when preparing your CSV — especially if you're using your own file or adjusting an export from another system. If a column contains invalid data, Presto will show those rows as “bad” during the preview step and skip them until the issues are corrected.
Below, you’ll find:
- Your organization’s available fields, including any custom or dynamic inventory fields
- Required inventory fields and their rules
- Optional inventory fields and the formats they support
- Data type rules for any dynamic fields
Your Organization’s Types
Each Presto Assistant organization has its own set of required fields and optional fields. The exact list can vary depending on your admin portal's configuration.
To see the complete set of allowable fields for your organization:
- Open the Inventory Import dialog.
- Expand Option 2 (“Use Your Own File”).
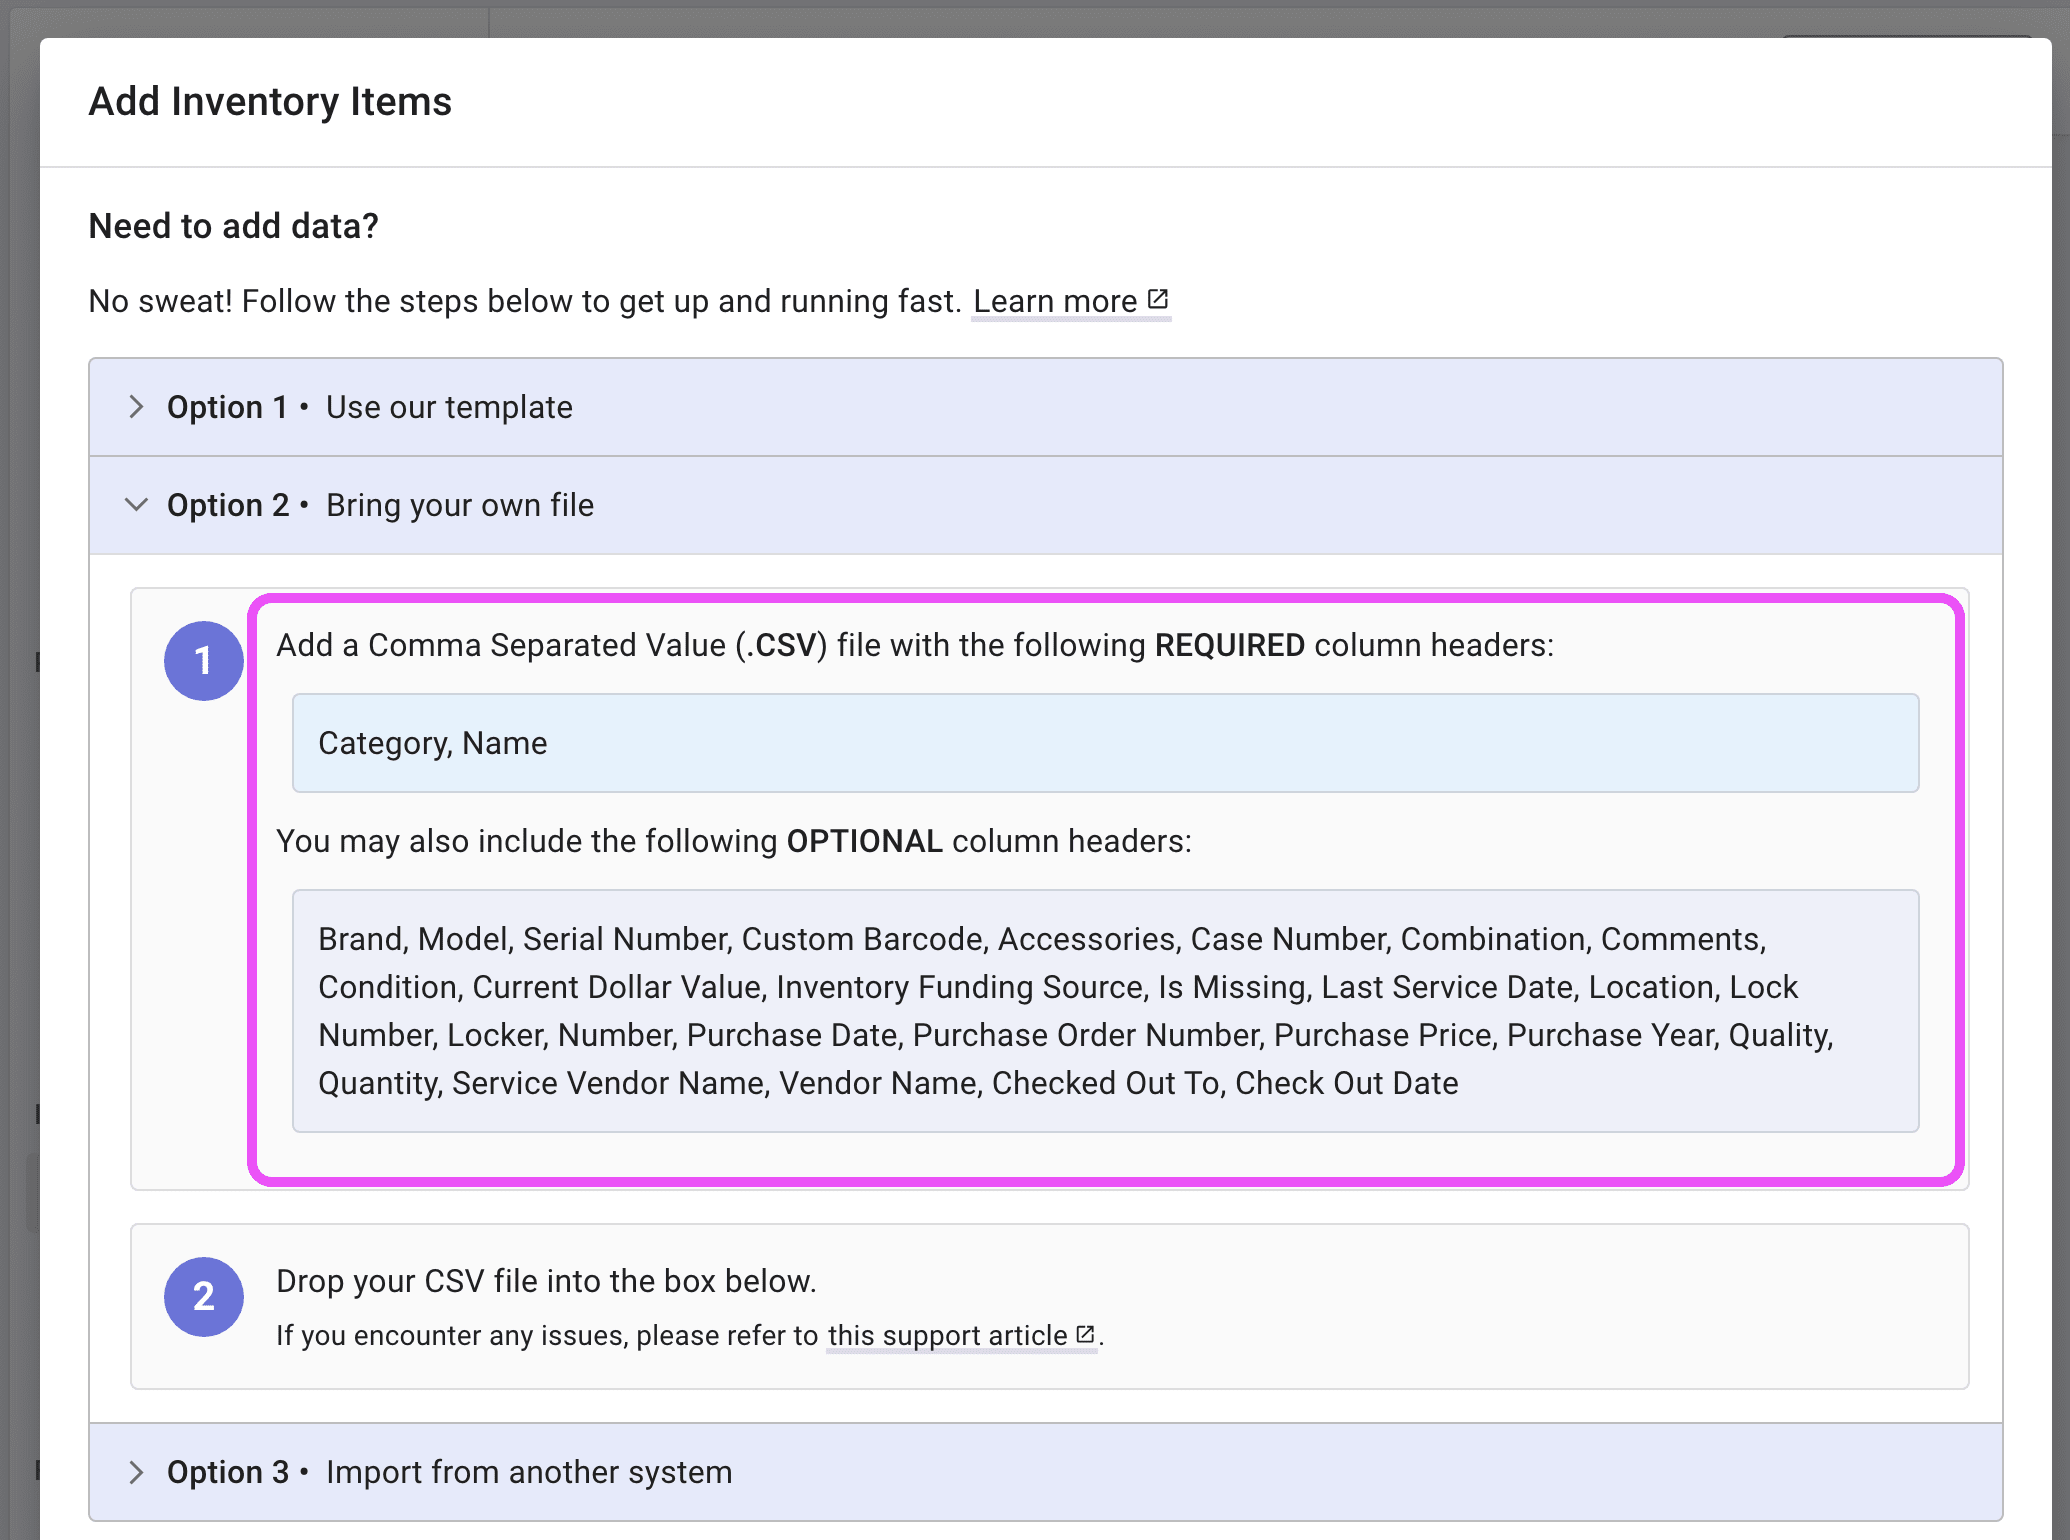
This view lists every column header your file can include — exactly the headers that Presto accepts during import. If your district uses Dynamic Fields, those will appear here as well, each with the data type chosen by your portal administrators.
Inventory Data Types - Required
These columns must be included in your CSV for Presto to create inventory items correctly.- Category
- Must match an existing inventory category in your district
- Must be connected to a district to create a new inventory category
- Name
- Text
- Minimum length: 2 characters
- Maximum length: 100 characters
Inventory Data Types - Optional
These columns are optional but can be included to capture extra inventory item details.Brand
- Text
- Maximum length: 50 characters
Model
- Text
- Minimum length: 2 characters
- Maximum length: 200 characters
Serial Number
- Text
Custom Barcode
- Text
Accessories
- Text
Case Number
- Text
Combination
- Text
Comments
- Text
- Maximum length: 1000 characters
Condition
- Must match one of the following values: New, Excellent, Good, Fair, Poor
Current Dollar Value
- Number
Inventory Funding Source
- Must match one of the following values:
- District Funds
- Campus Funds
- Booster Funds
- Donation
- Grant Funds
- Other
- Must match one of the following values:
Is Missing
- True/False
Last Service Date
- Date formatted like MM/DD/YYYY or M/D/YYYY, e.g. 01/01/1999
- If present, a value for Service Vendor Name must be present
Location
- Text
Lock Number
- Text
Locker
- Text
Number — a number assigned by your organization or district
- Text
Purchase Date
- Date formatted like MM/DD/YYYY or M/D/YYYY, e.g. 01/01/1999
Purchase Order Number
- Text
Purchase Price
- Number
Purchase Year
- Four-digit year, .e.g. 2019
Quality
- Must match one of the following values: High, Average, Low
Quantity
- Positive integer
Service Vendor Name
- Text
- Must be a service vendor in our system. If you encounter an error, reach out to support@presto-assistant.com. Our team is building a database of service vendors, and we can add this data for you.
Vendor Name
- Text
- Must be a vendor in our system. If you encounter an error, reach out to support@presto-assistant.com. Our team is building a database of vendors, and we can add this data for you.
Checked Out To
- Student member data: email, student id, or name (First Last or Last, First)
- Make sure this student is already added to your organization before providing this checkout information.
Check Out Date
- Date formatted like MM/DD/YYYY or M/D/YYYY, e.g. 01/01/1999
Things to keep in mind #
- Instead of adding “test data”, please use real data. Presto Assistant never really deletes any data, and using your real data will keep things cleaner for you later on. You probably don’t want to see “Test Inventory Item - 12345” in your data. Also, your program numbers will be wrong if you add fake data.
- Importing inventory data will always add data. To update existing data, use Edit Mode, Global Edit, or edit individual items.
Troubleshooting #
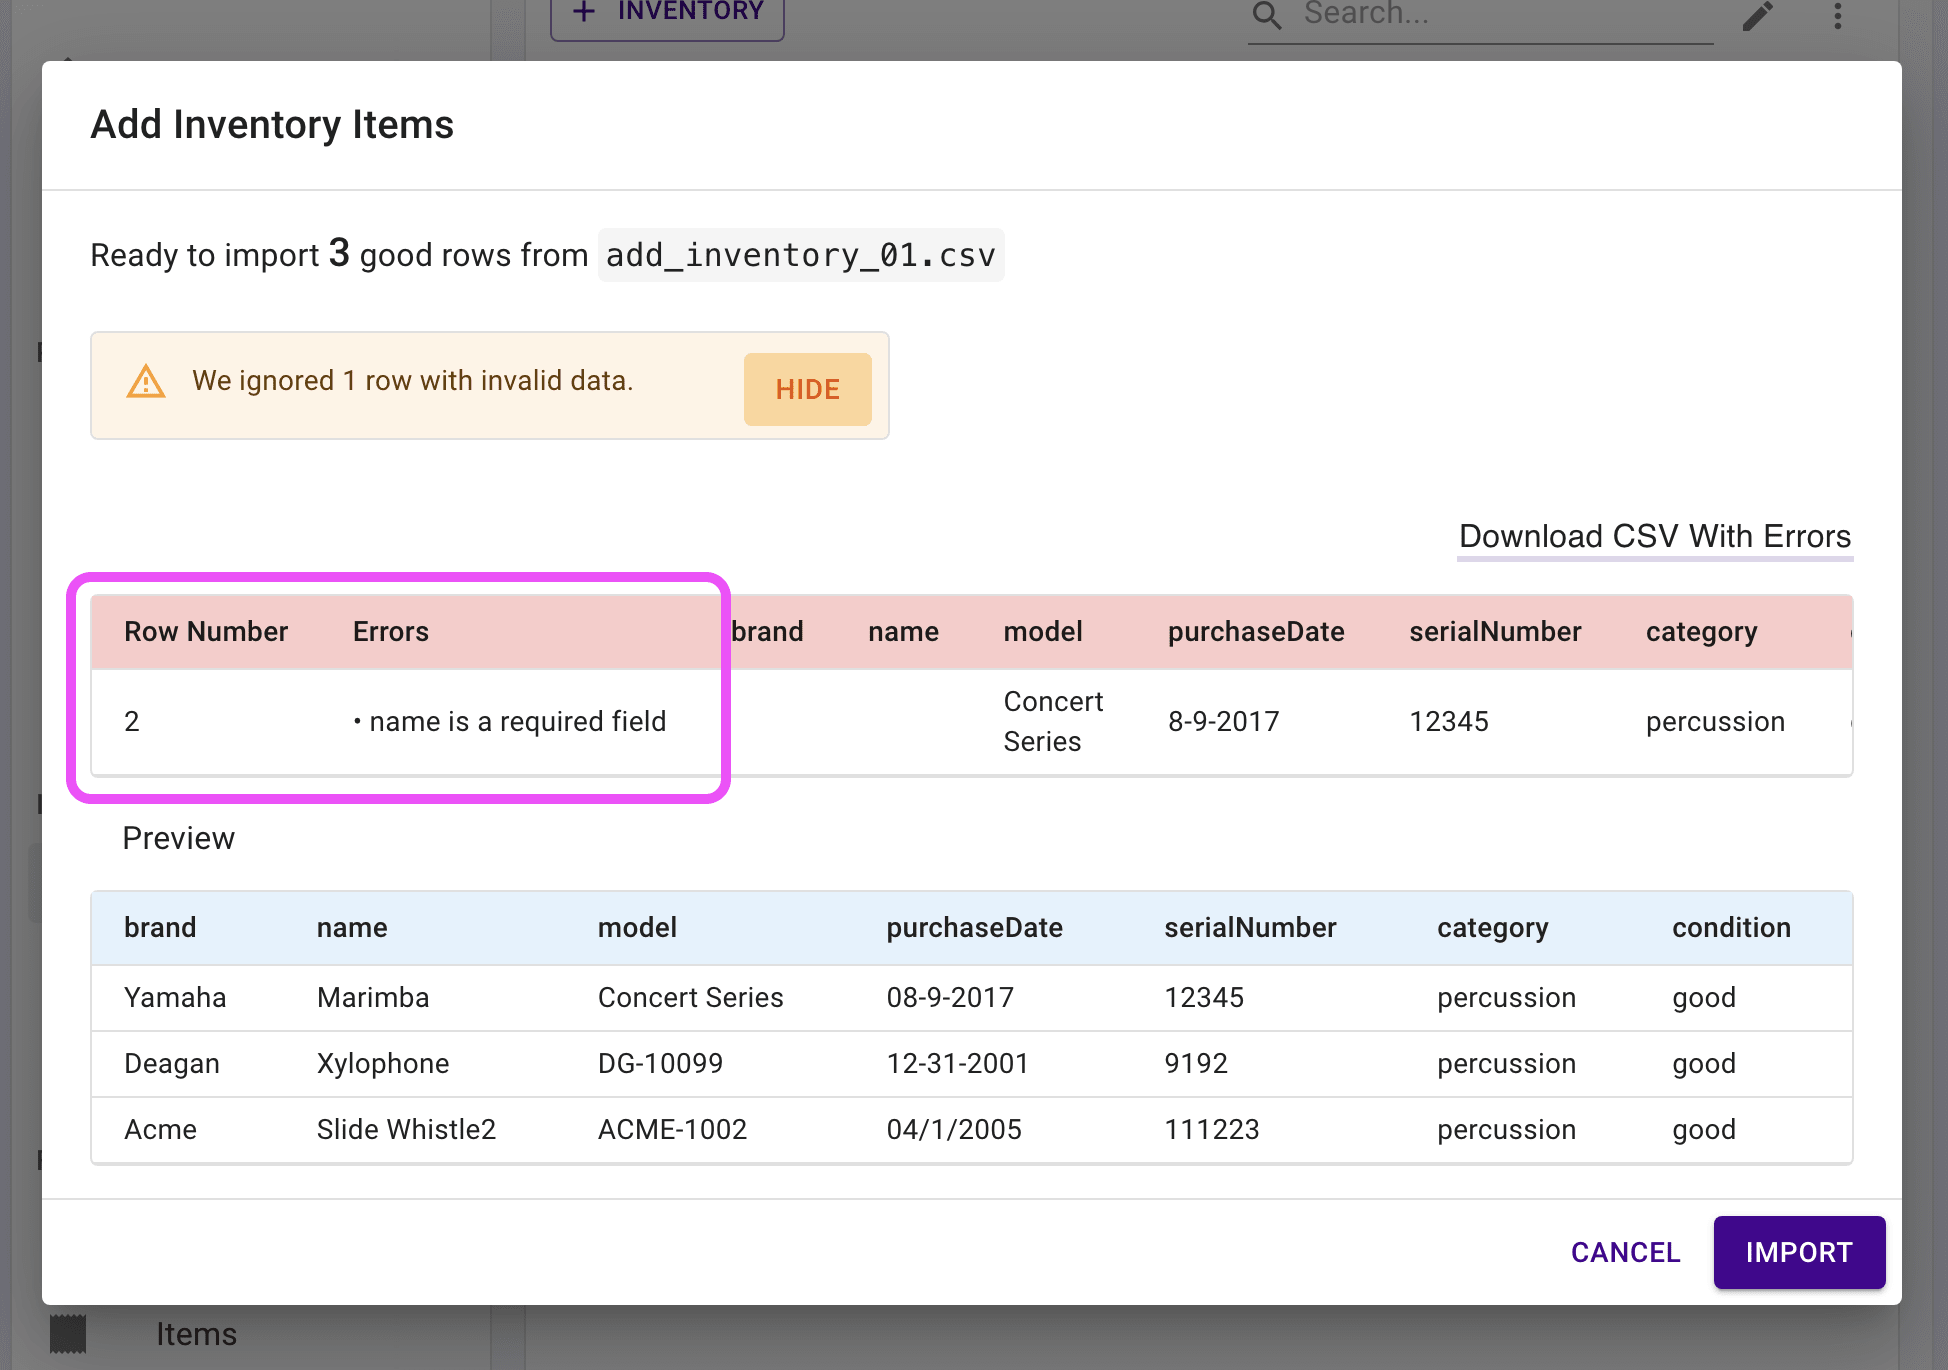
- If you see an alert that says some rows have invalid data, press the "SHOW" button to see the rows that have issues.
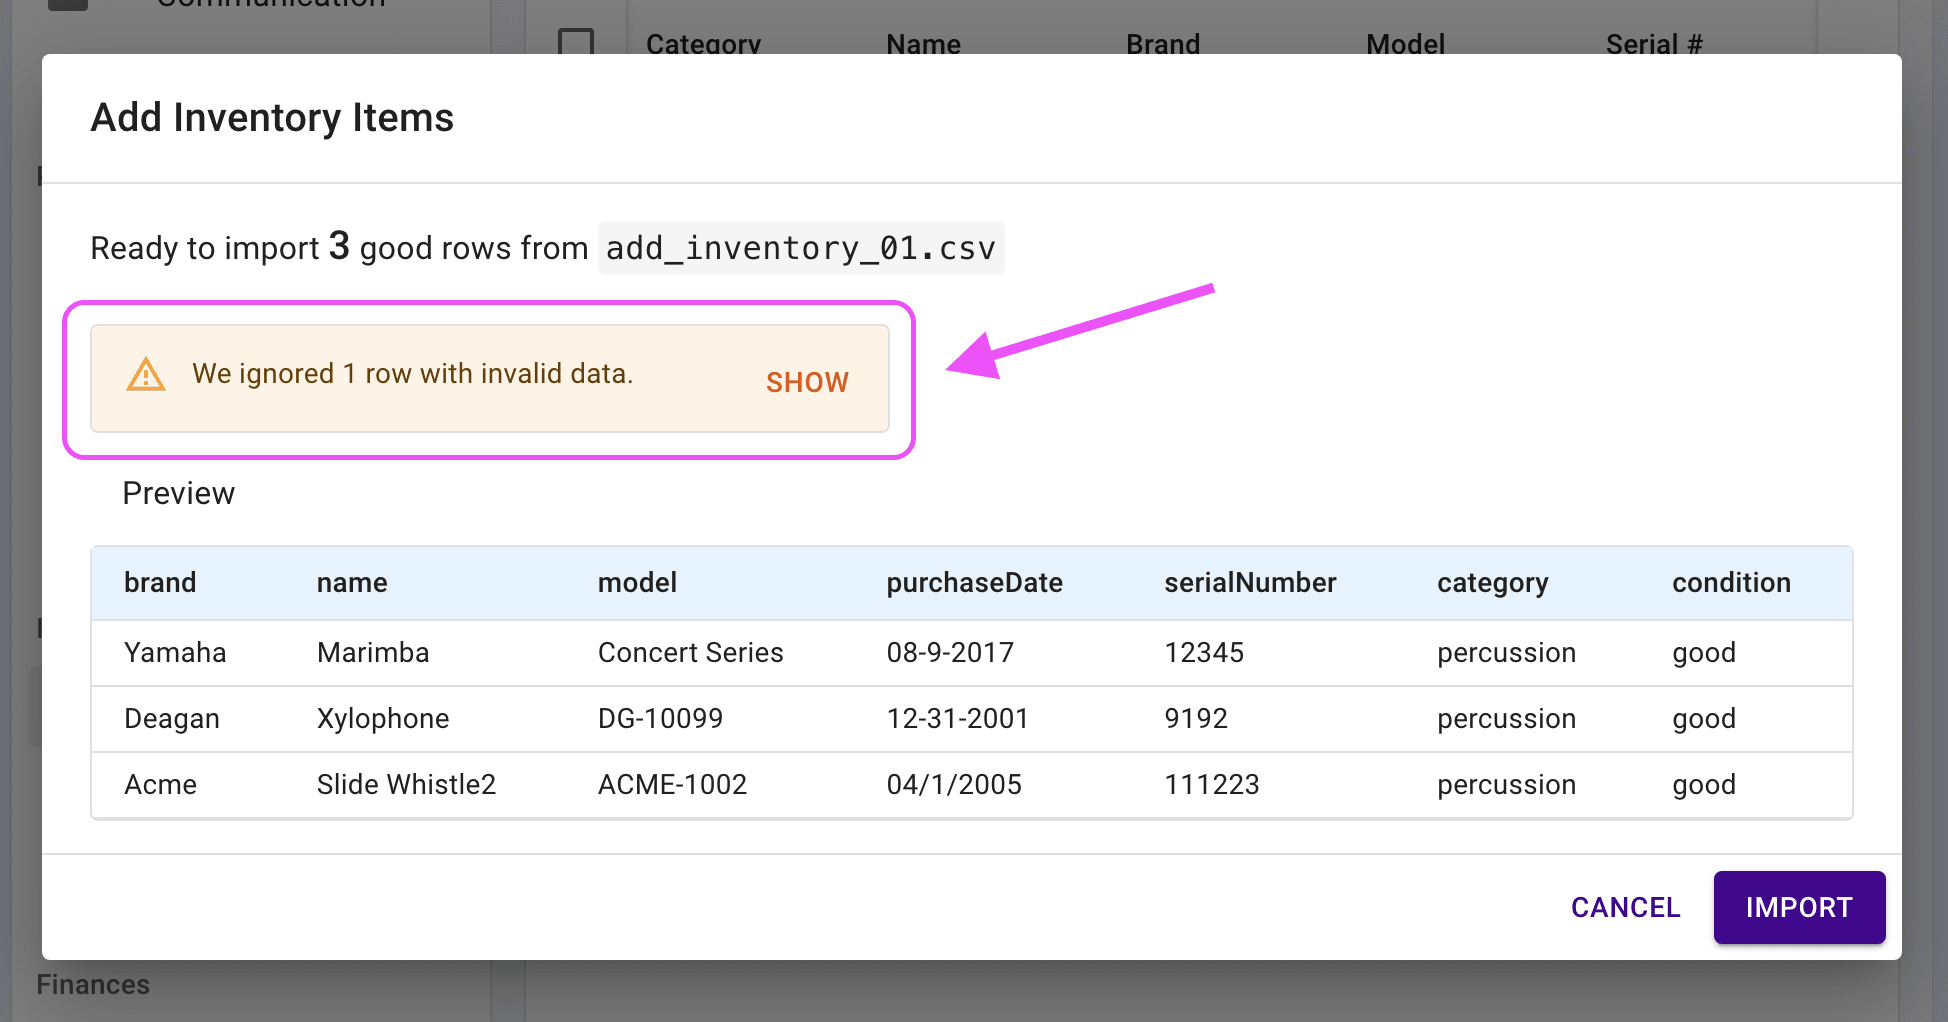
- All rows with invalid data will show the row number in your file and which issues to fix for data in that row.
- You can choose to import all good data right now and come back to fix the issues later.
- Keep in mind that importing inventory items will possibly create duplicates if you import the same data again.
- If you fix the issues right now, hit the Cancel button to restart the import process.
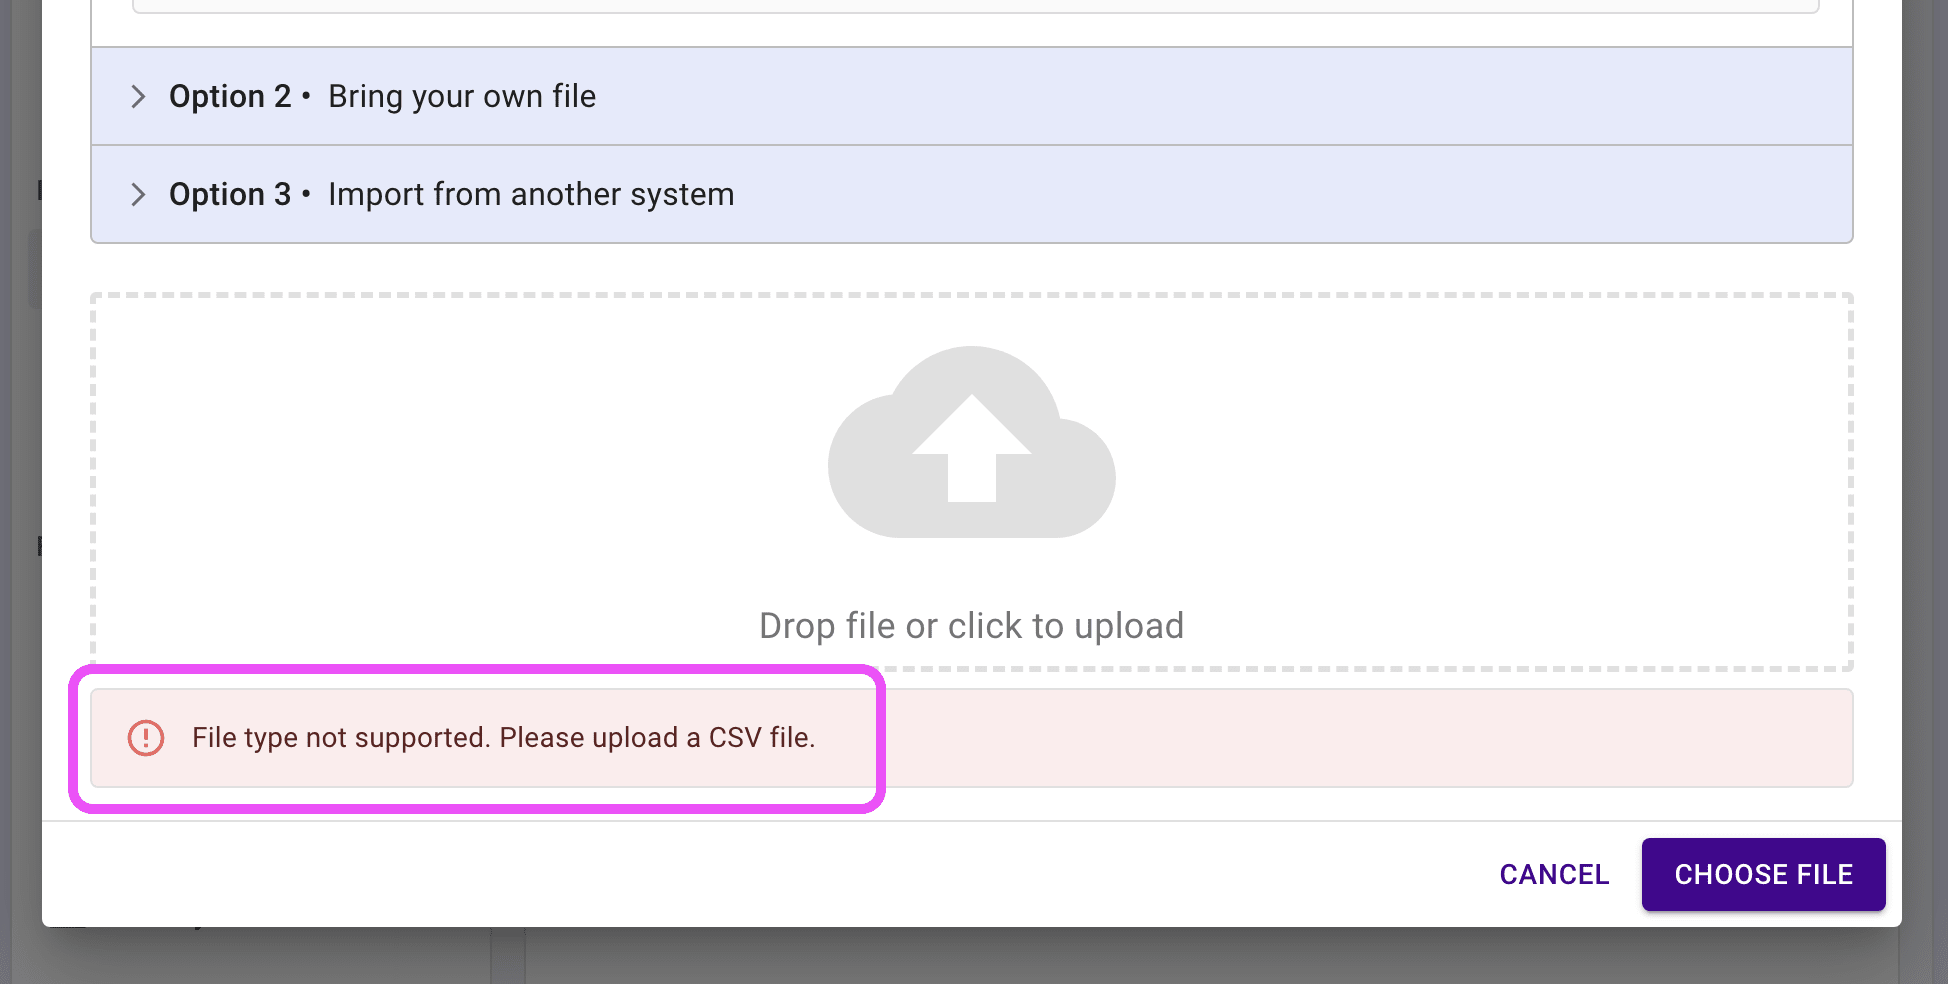
- If you attempt to add a file that is not a CSV file, you will see an error message. Make sure you are importing a CSV file.
Did you know? #
All parts of Presto Assistant that support importing data work the same way. We aim to keep it simple.