Prerequisites #
- You should have a Presto Assistant organization set up.
- Need to set up an organization? This article will show you how.
- You should have data in a file using the "Comma-separated Values" CSV format. This could be data that you have exported from a tool like Google Sheets, Microsoft Excel, or others.
Getting Started #
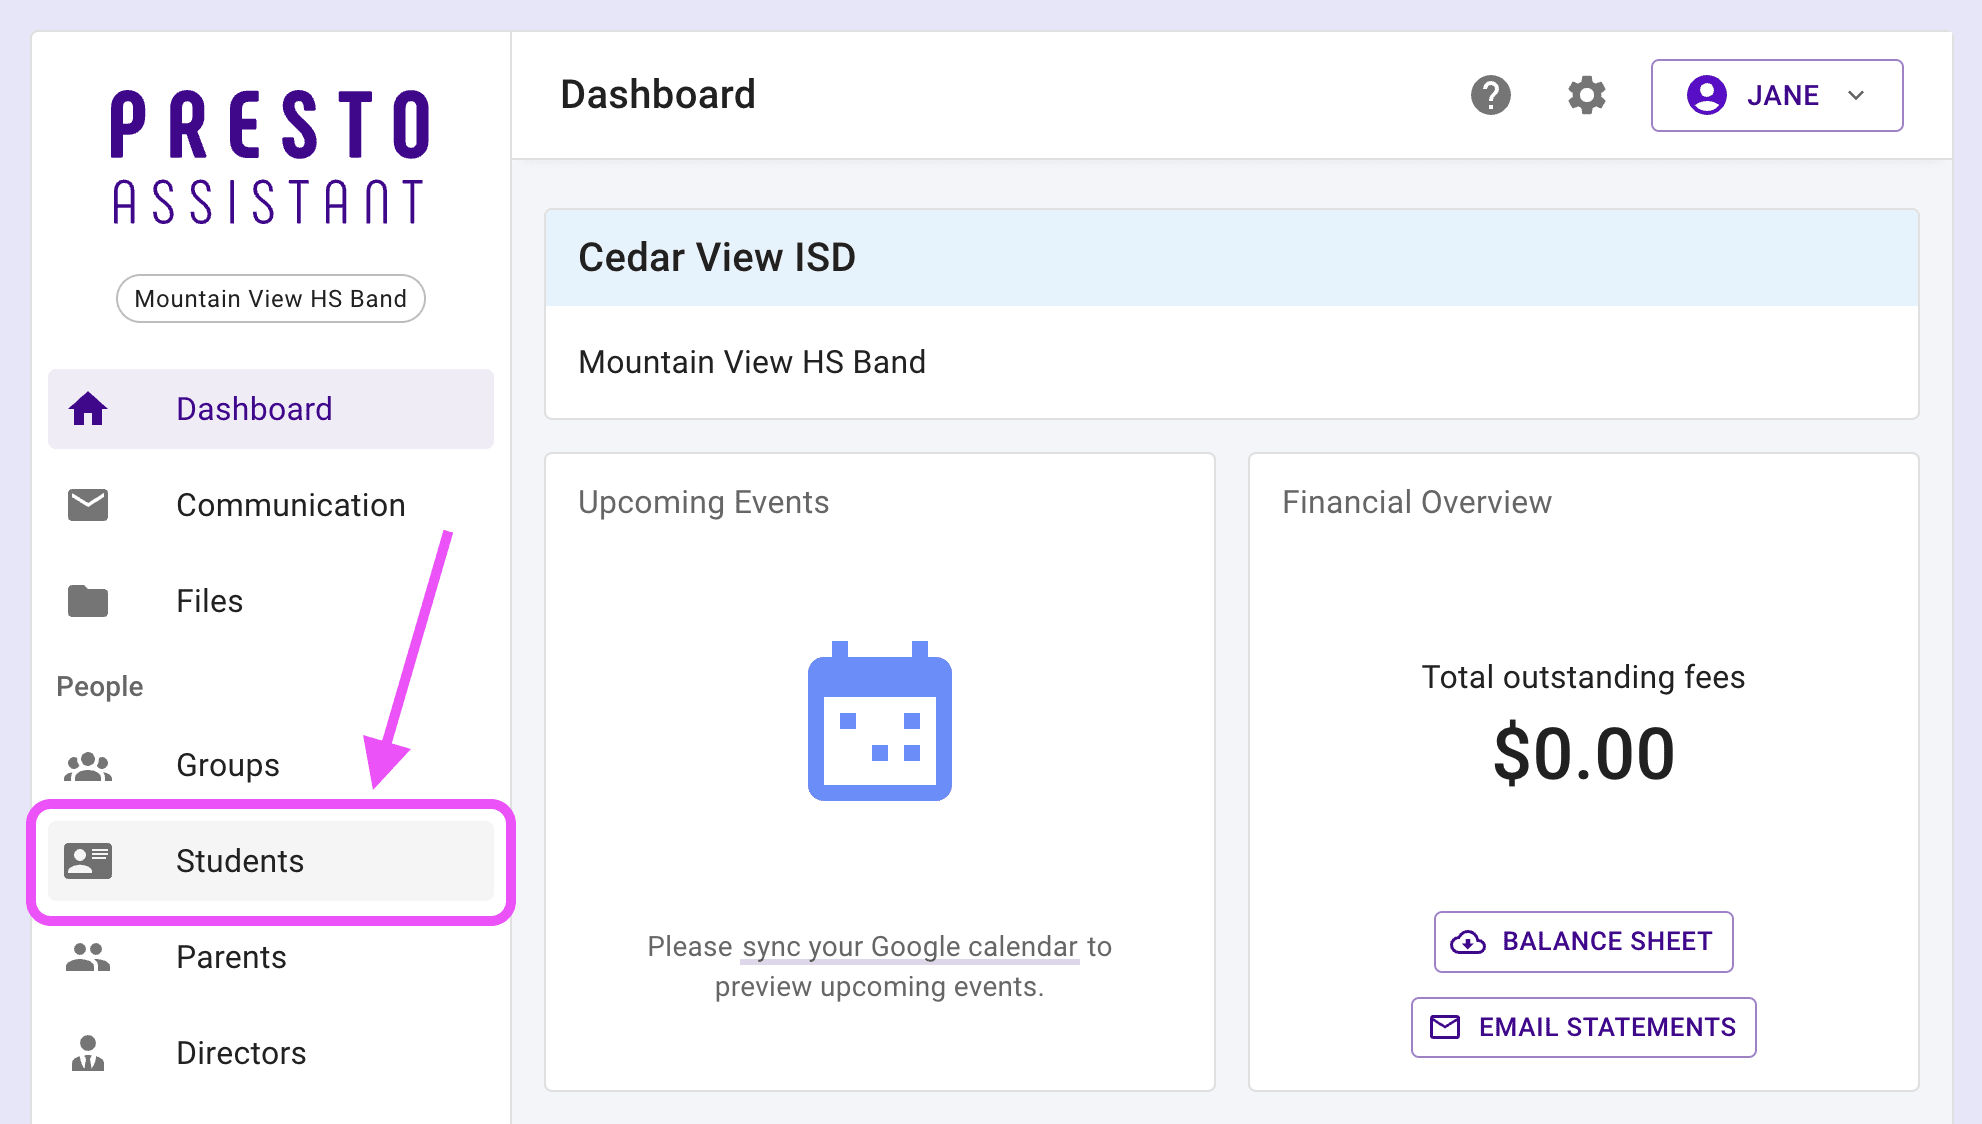
- From the Dashboard, click the Students item in the left navigation menu.
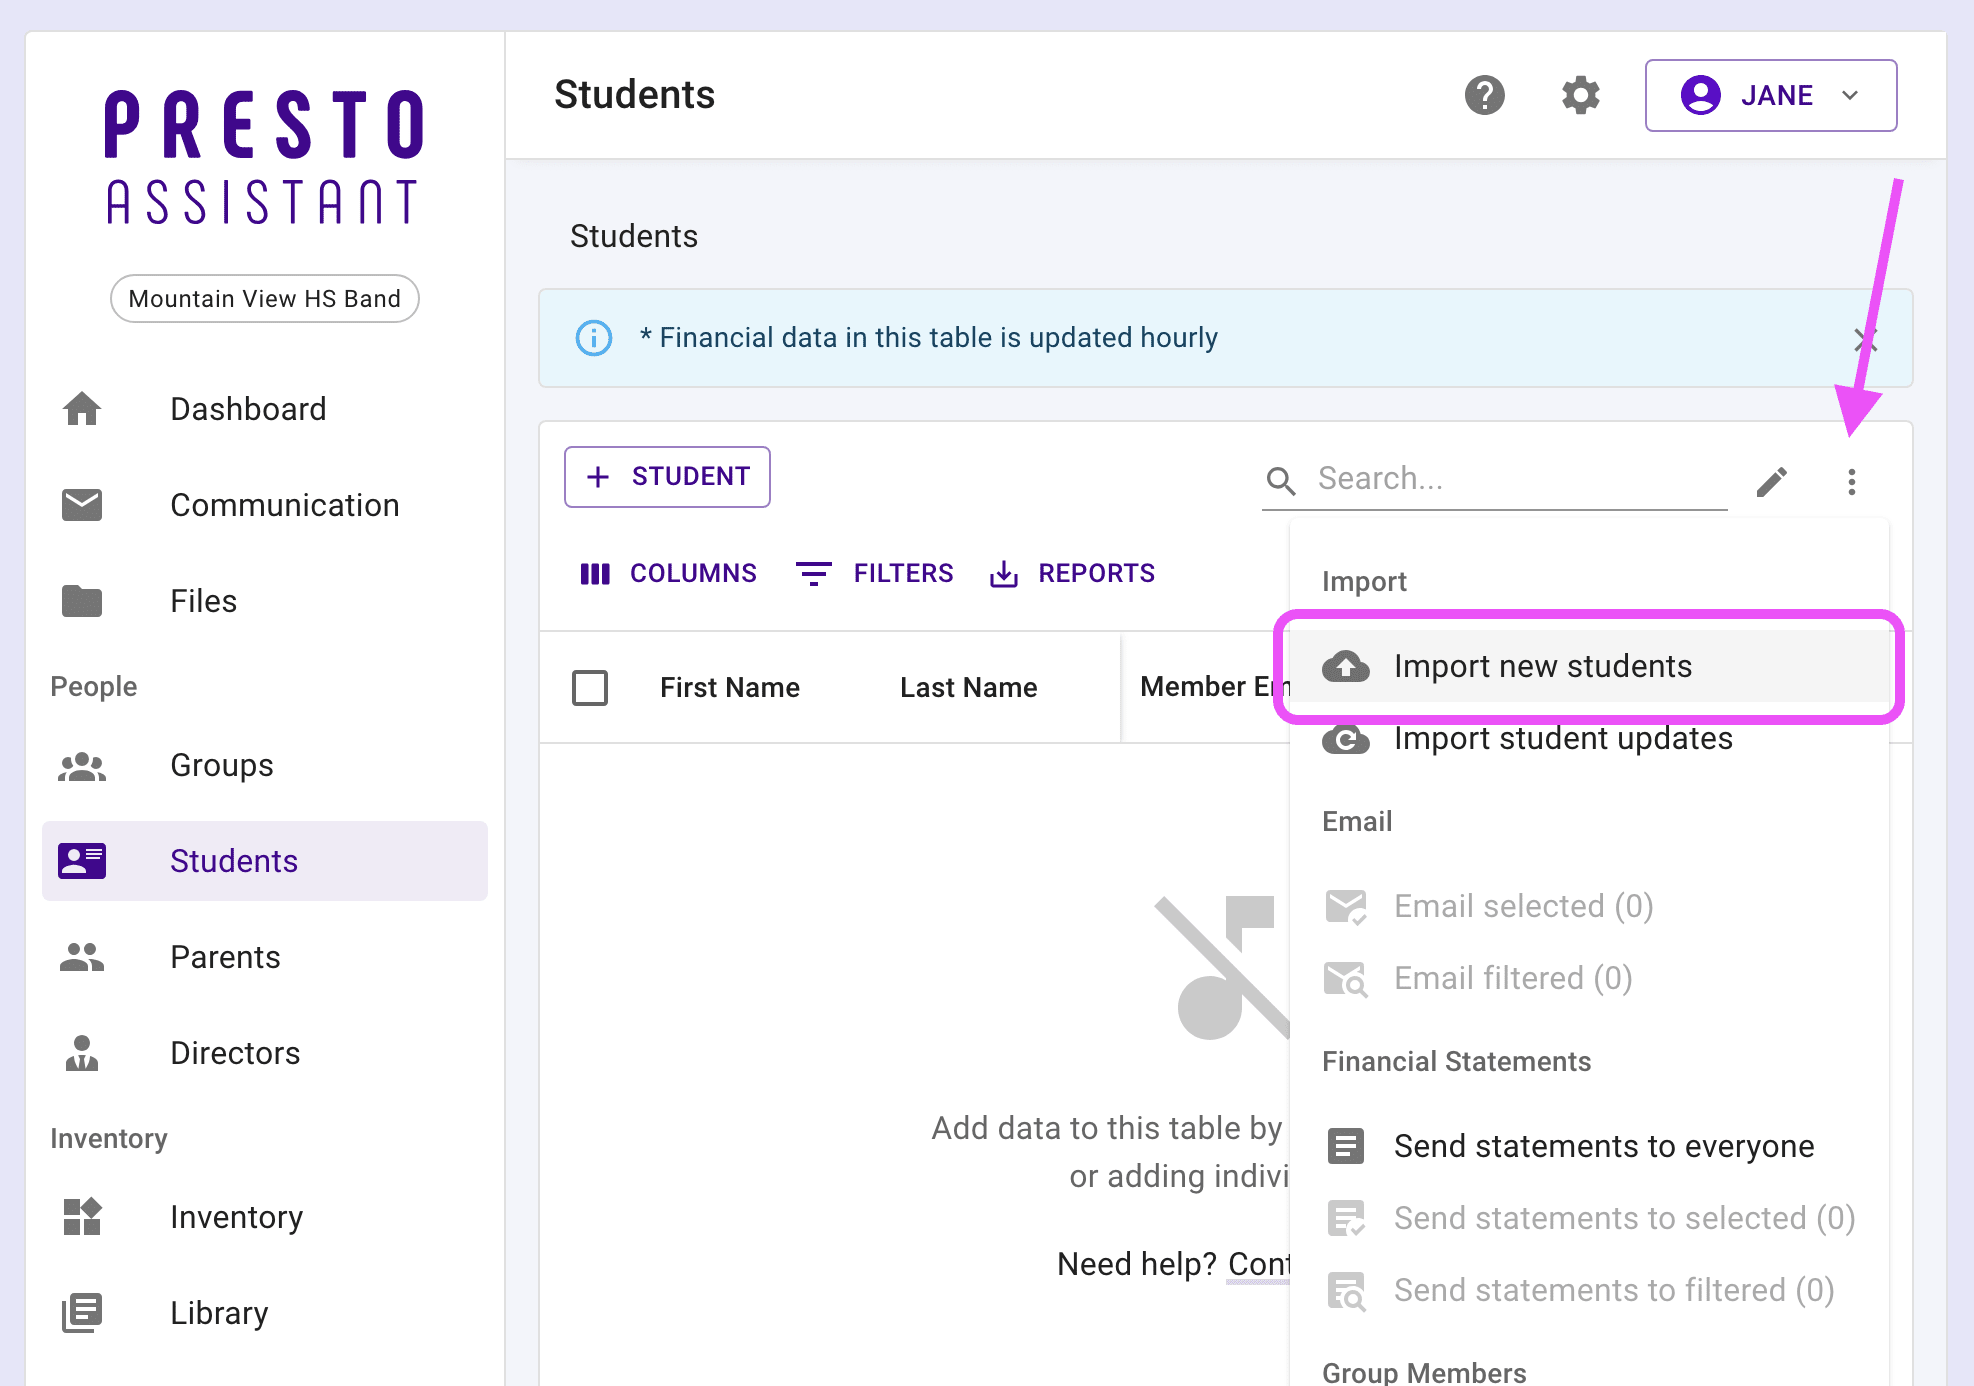
- Click the triple-dot "More Actions" icon button at the top right of the table. If you are creating the student data for the first time in this organization, click on Import new students.
- Don't use this option if any of the student data already exists in this organization. Use "Import student updates" to update the data for students that are already in your organization.
Tip
Any parent information you include in an import will automatically generate Adult accounts and associate them with the corresponding student as a Family.
Three Import Options #
Choose one of our three options to add large amounts of data to the Presto Assistant system.
- Use the Presto Assistant template
- Use your own CSV file
- Send your data files to Team Presto
Use Our Template #
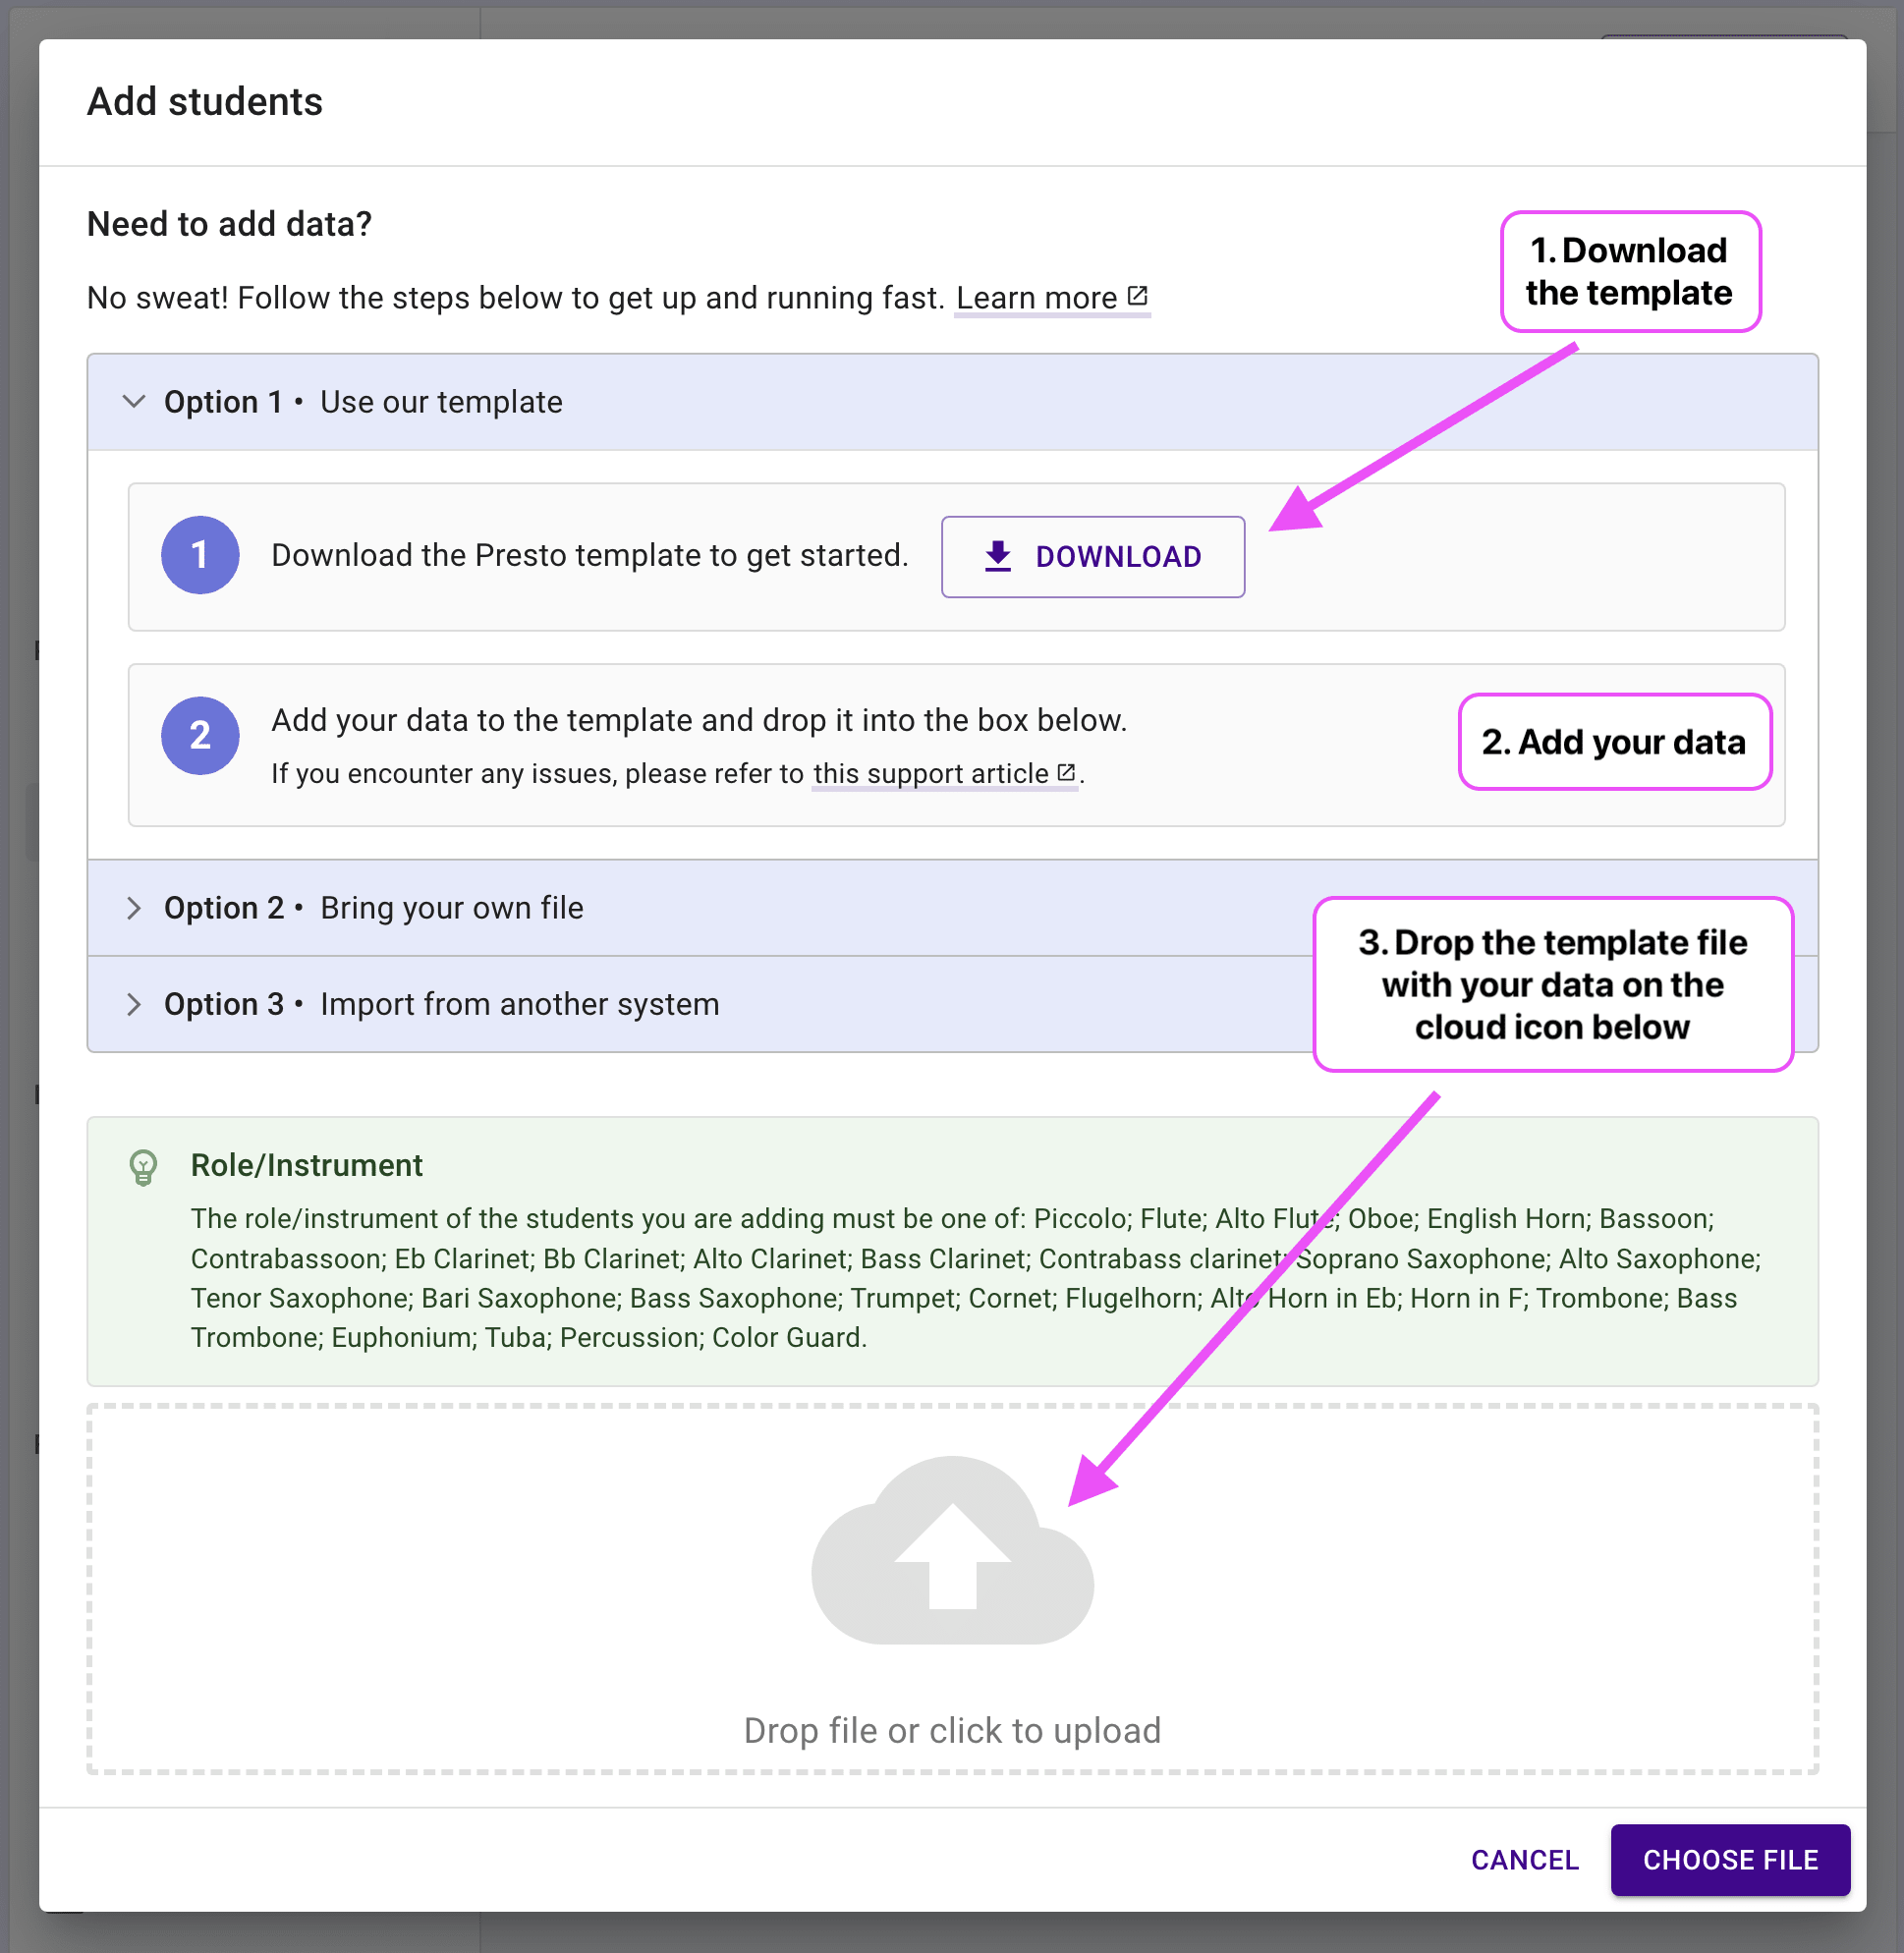
Transfer your data to the template that comes with all Presto column headers. Import that file into Presto Assistant.
Download the template file and move your data over to this new file.
- The template file will have all of the column headers for your organization, both REQUIRED and OPTIONAL.
- You will also see column headers for Dynamic Fields if your district uses that feature of Presto.
Drop the updated template CSV file onto the cloud icon.
- Head to the Preview and Finish Importing section below.
Use Your Own File #
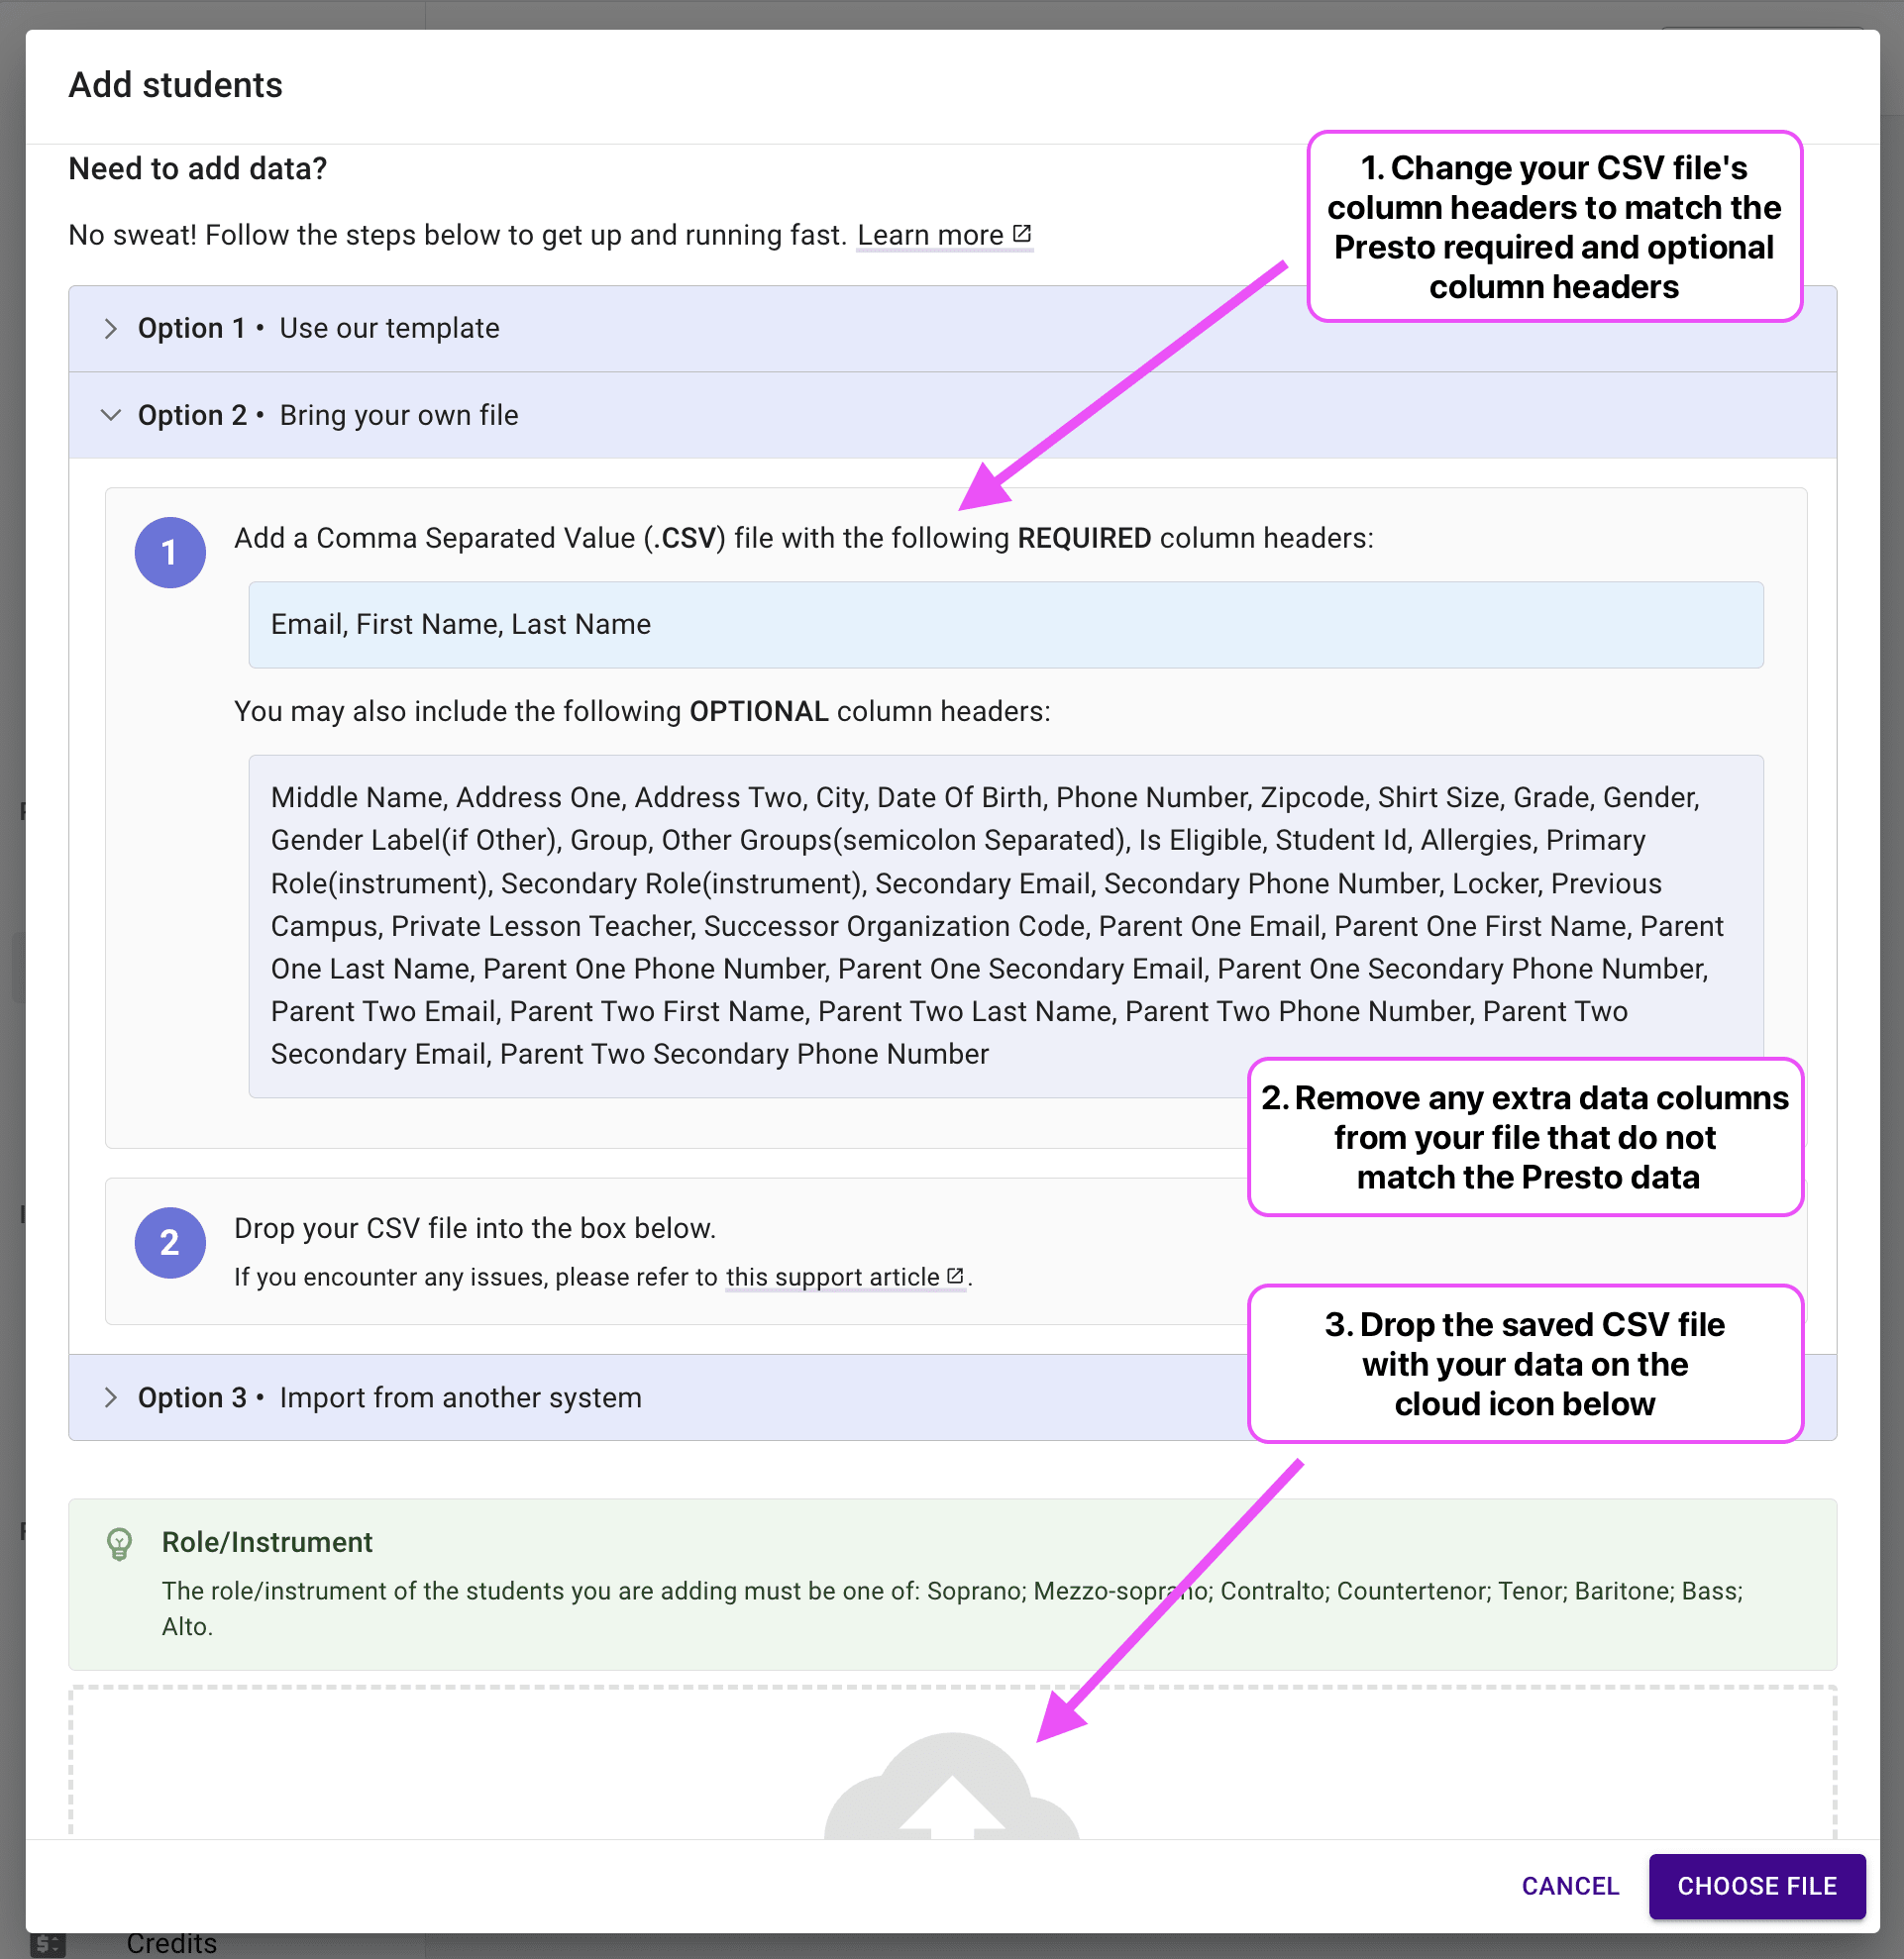
Make sure your CSV file has the correct column headers, and import it into Presto Assistant.
Open the target CSV file that contains your data.
- We suggest that you make a copy of your data since you'll be updating that CSV file directly.
- If you have a file in another format like XLS, use your spreadsheet program to export the data to "Comma-separated Values" (CSV) format for use with Presto.
In Presto, press the arrow next to "Option 2"
Adjust your CSV file to use the Presto Assistant column headers format. For example, your data might have Full Name which would need to split into firstName and lastName to follow the Presto method.
- Capitalization and spacing doesn't matter for these fields. We will treat "first Name" and "Firstname" the same way.
Remove any extra columns and save the file.
Drop the updated CSV file onto the cloud icon.
- Head to the Preview and Finish Importing section below.
Import From Another System #
The EASY button — We can migrate your data for you, up to a week turnaround depending on the time of the year.
Export your data from the old system into a CSV file.
In Presto, press the arrow next to "Option 3"
Select which system you are migrating from and drop your CSV file onto the cloud icon.
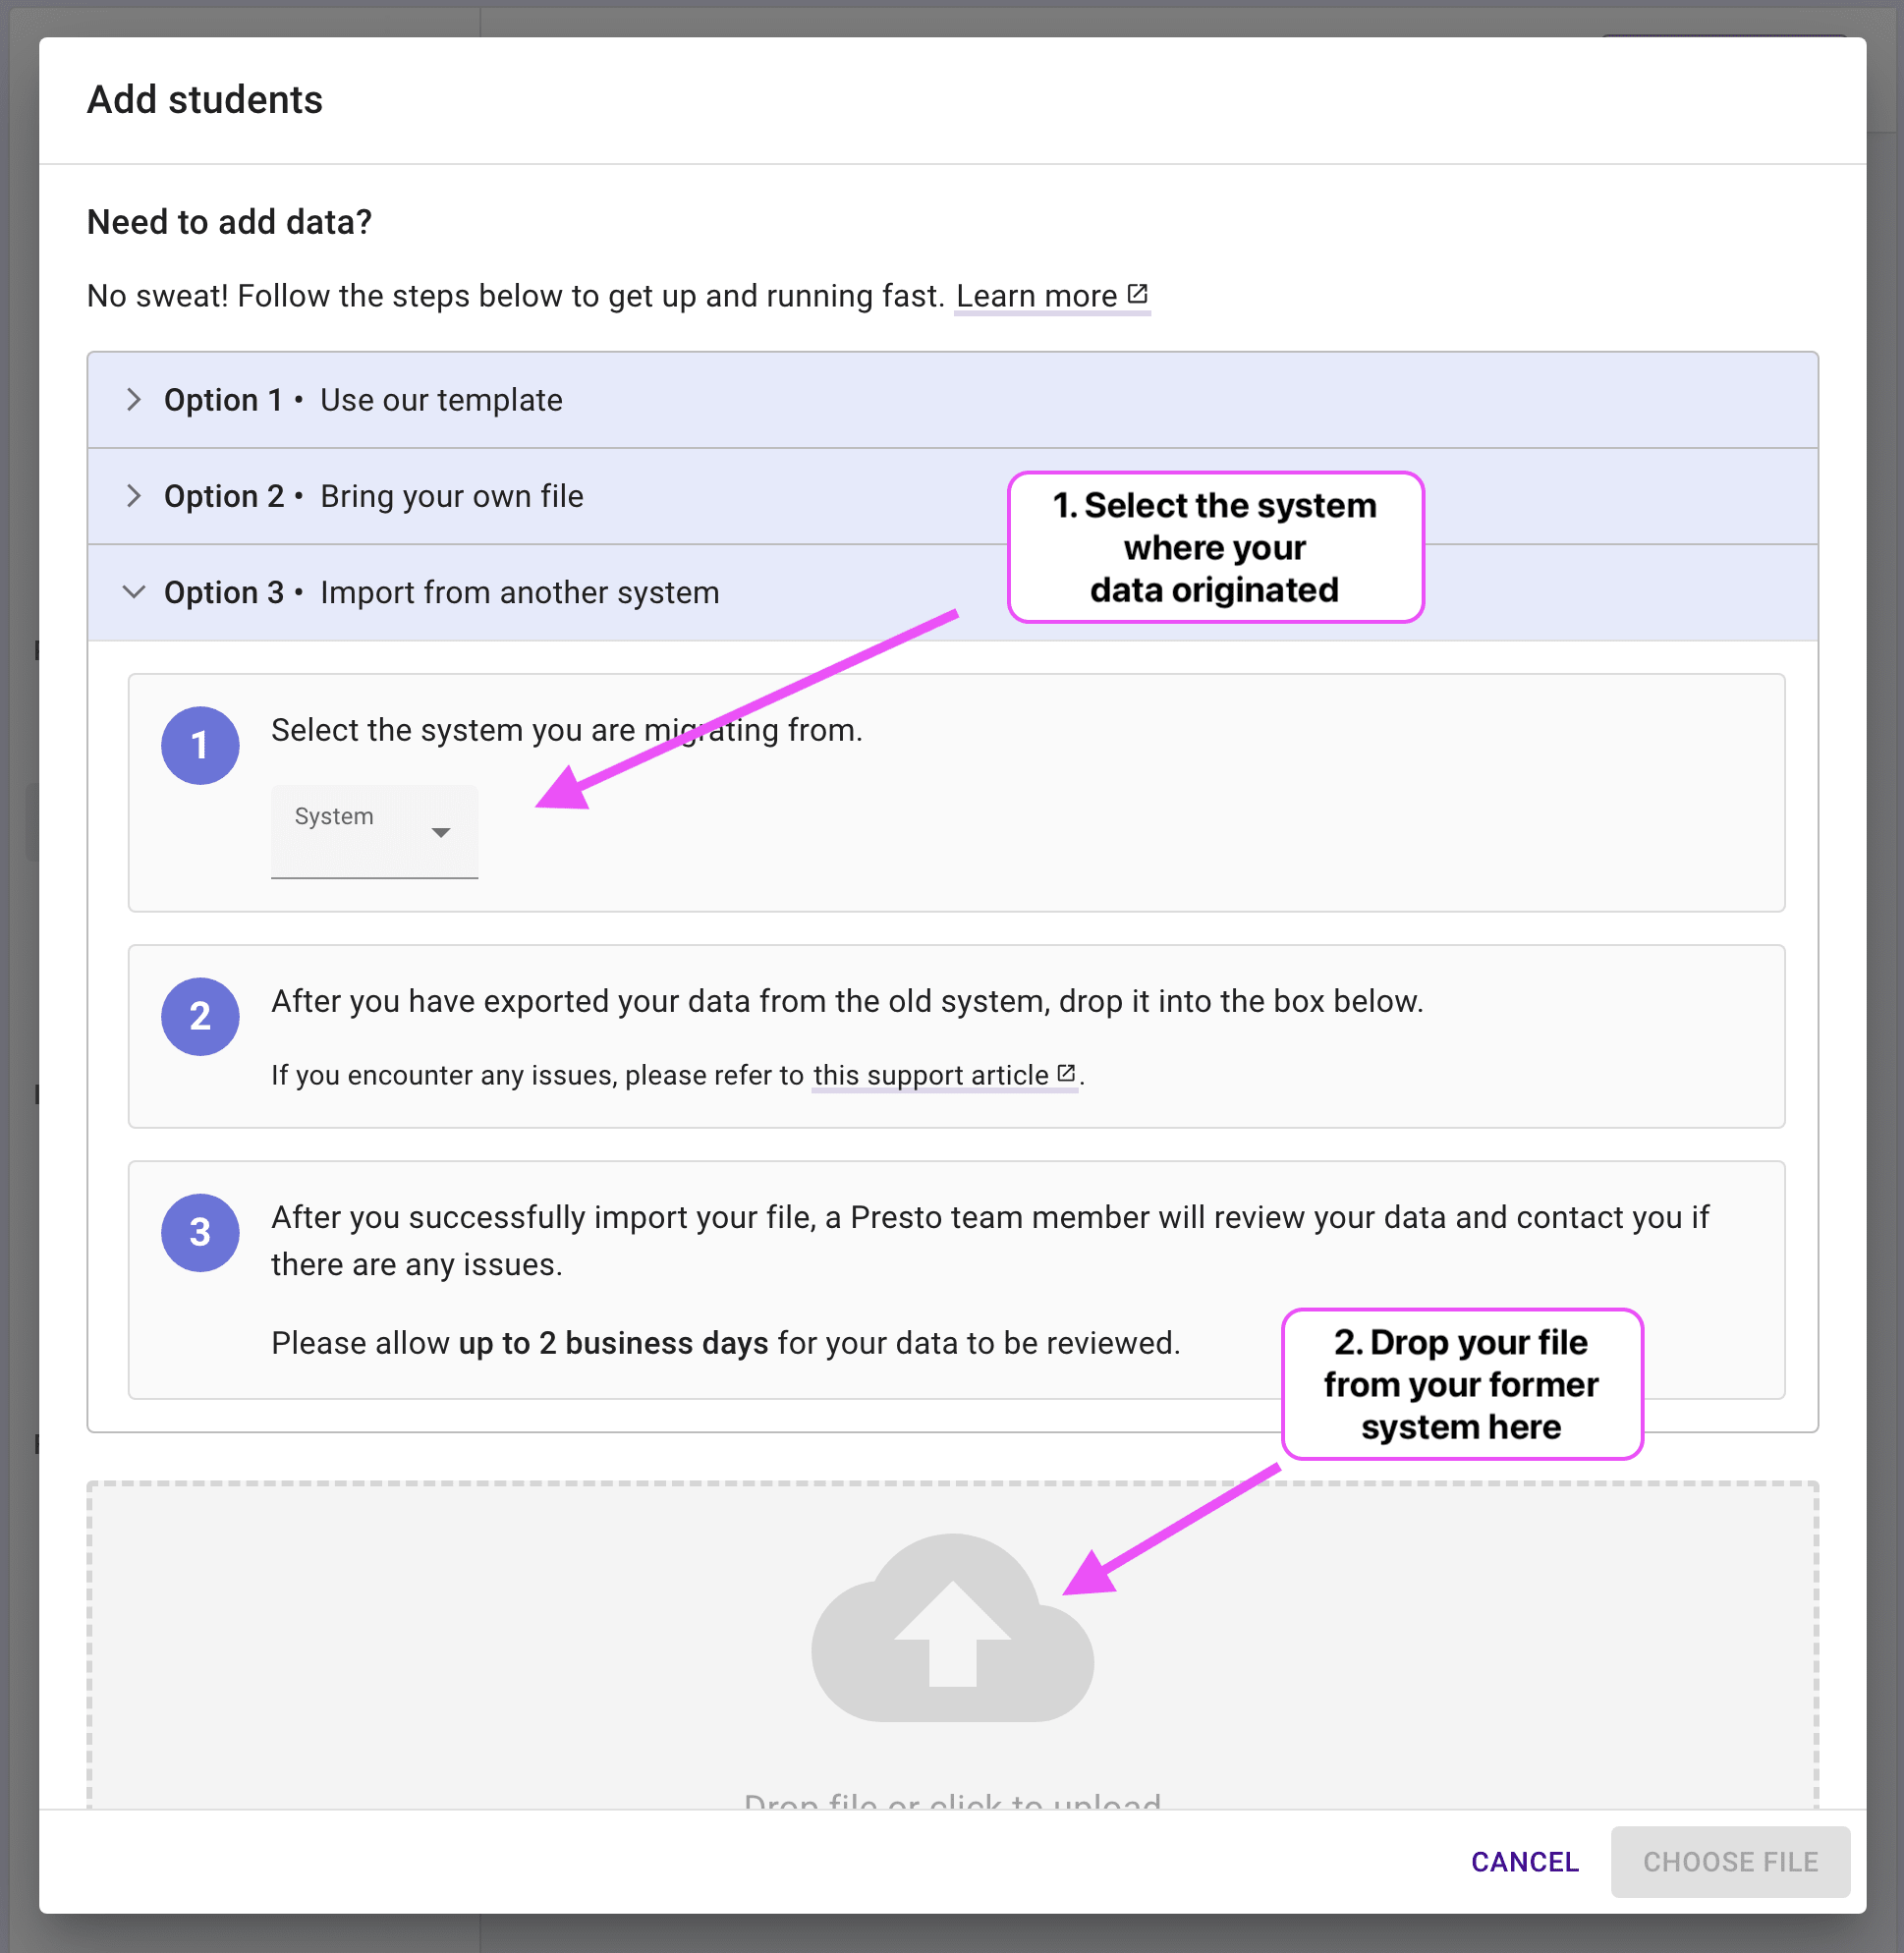
Team Presto will take care of the rest. We will be in touch with any questions or to let you know we are done!
Tip
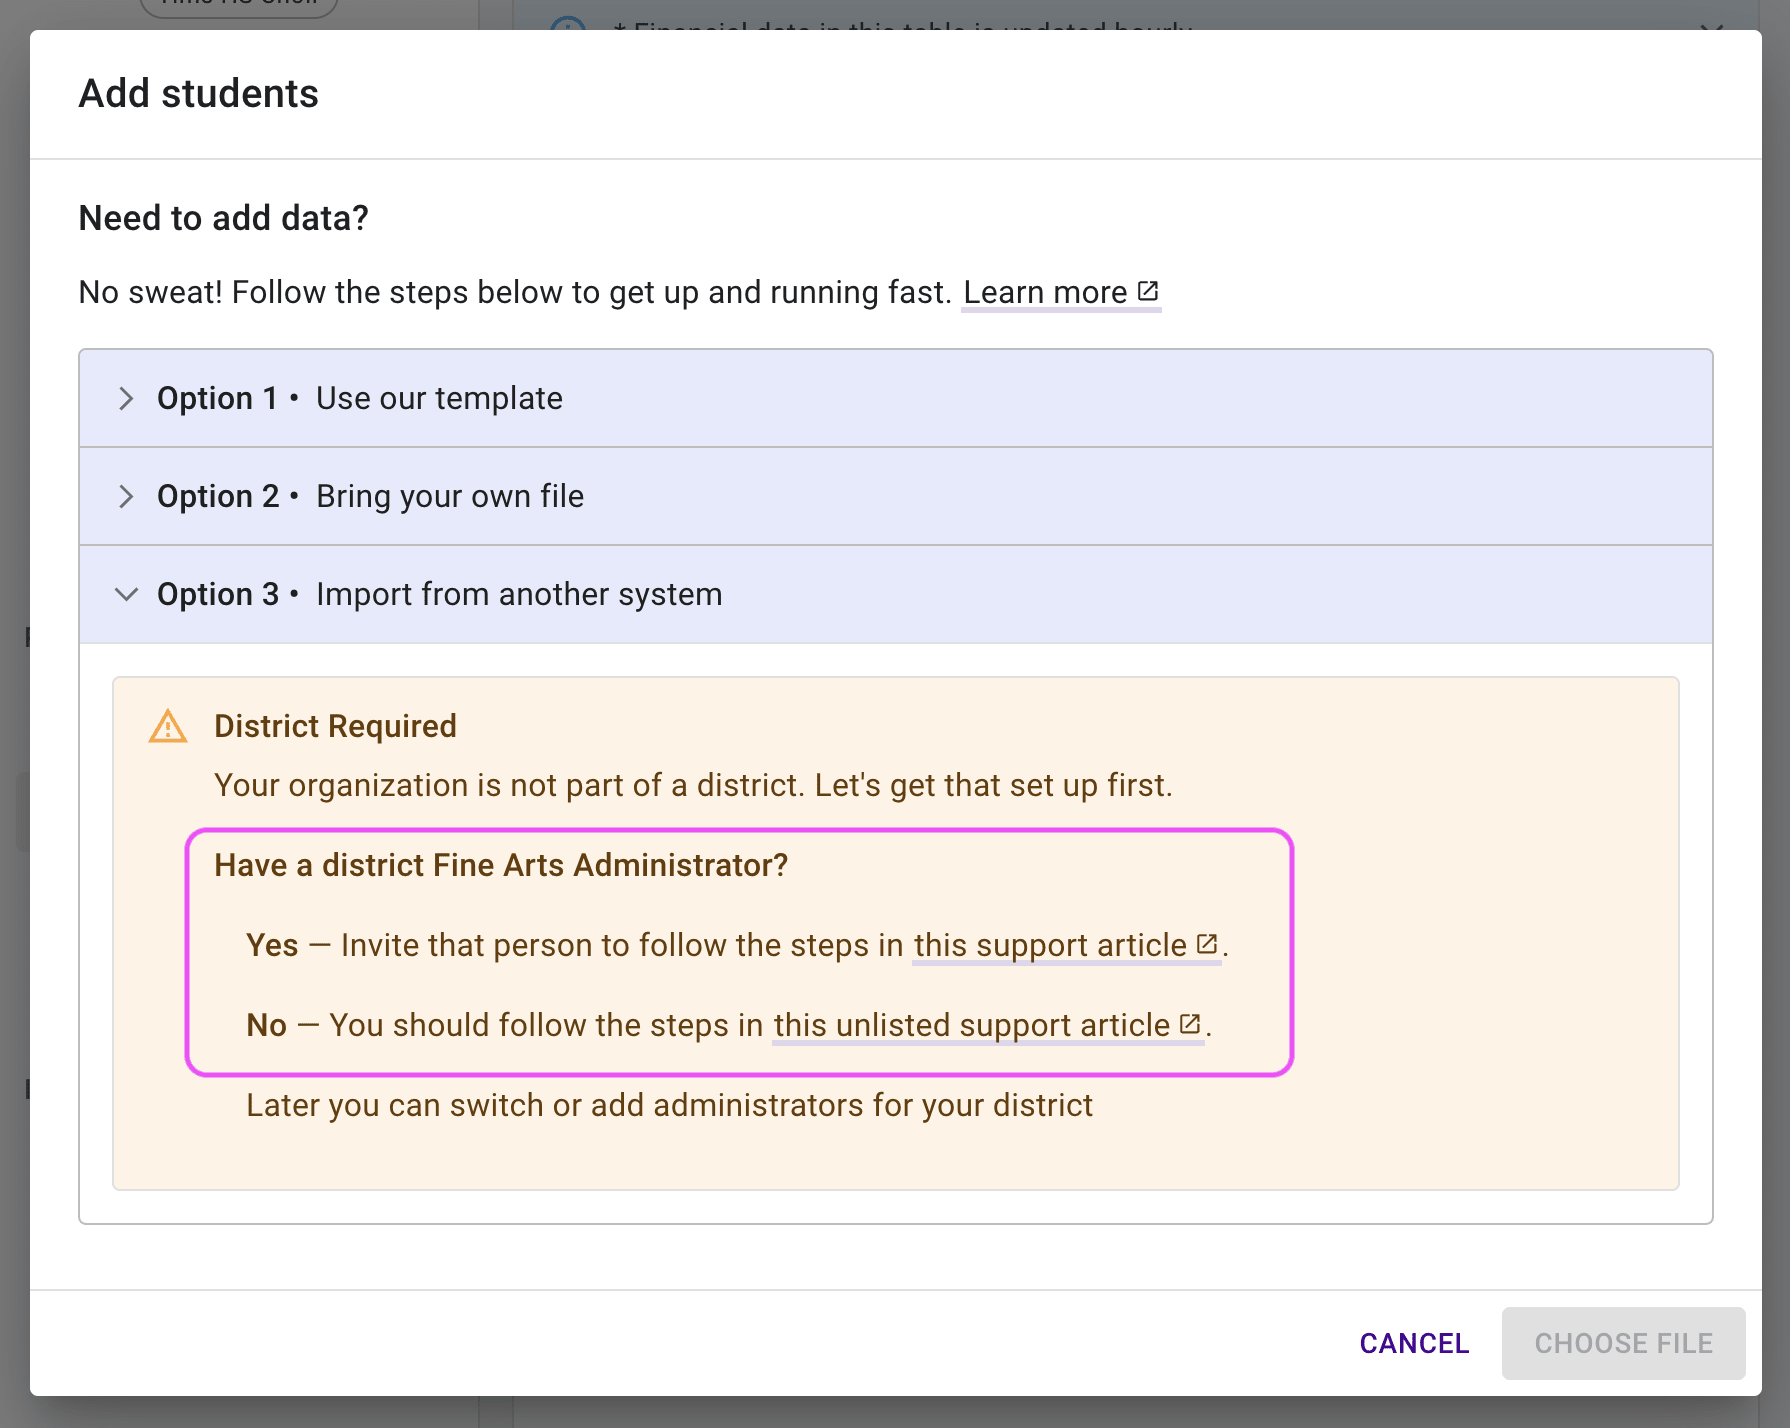
Option 3 requires that your organization is connected to an Admin Portal.
Preview and Finish Importing #
- The last step of the import process will show you a preview of the "good" and "bad" rows that we detect (pictured below). This is a chance to correct any issues like missing “required” fields in some rows.
- The preview only shows 10 rows of data.
- If bad rows are present, you can still import the rest of the data. The system will ignore the bad rows.
- See the Troubleshooting section below for more help.
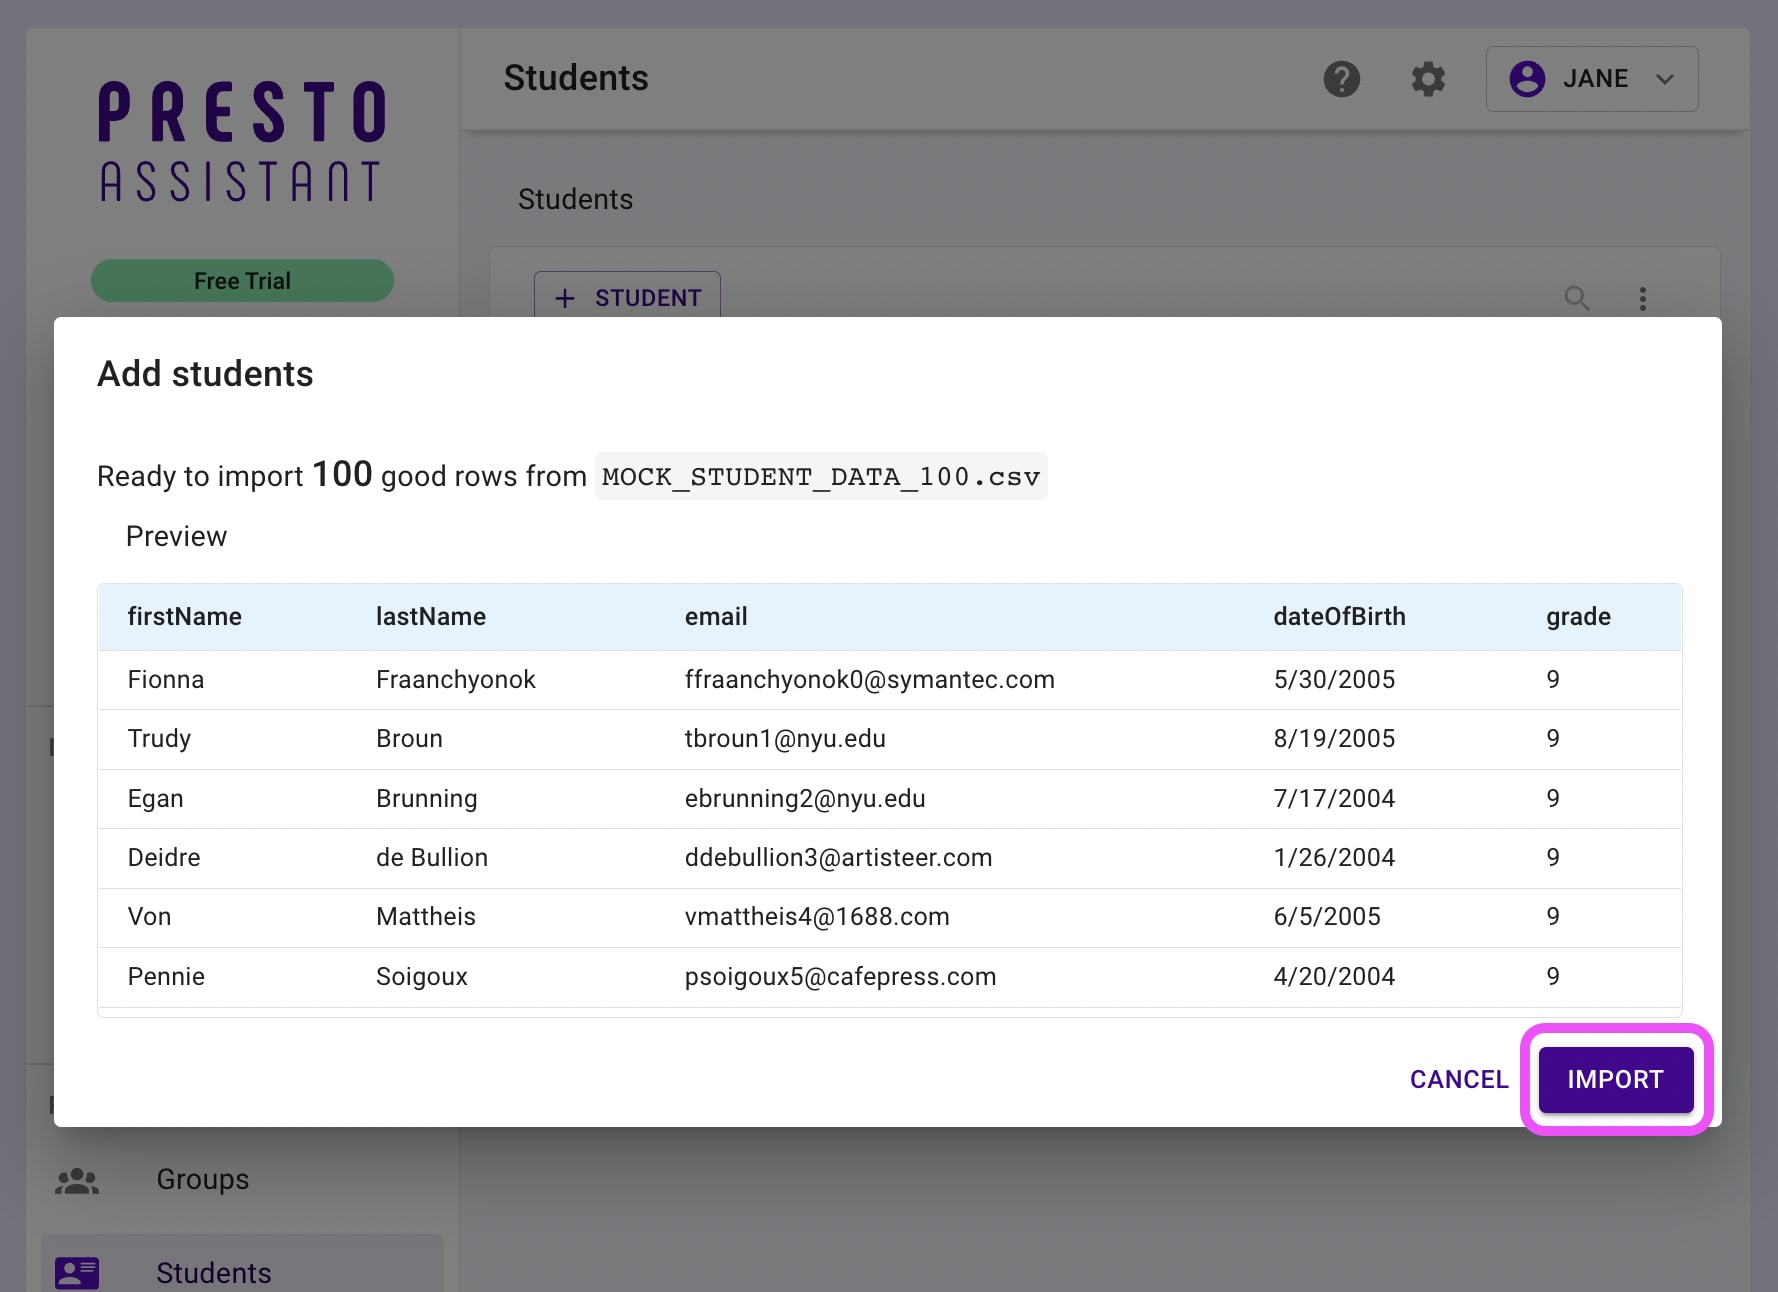
If all data looks good, then press the purple Import button. Your data will be available in the system within a few seconds. Presto means FAST!
Data Types #
When you import a CSV into Presto Assistant, each column must contain data in a format that Presto can understand. This section explains what each field expects, including which fields are required, which are optional, and the specific type of value that belongs in each one (text, date, number, allowed values, etc.).
Think of this as your reference guide when preparing your CSV — especially if you're using your own file or adjusting an export from another system. If a column contains invalid data, Presto will show those rows as “bad” during the preview step and skip them until the issues are corrected.
Below, you’ll find:
- Your organization’s available fields, including Dynamic Fields
- Required student fields and their rules
- Optional student fields and the formats they support
- Data type rules for Dynamic Fields
Your Organization’s Types
Each Presto Assistant organization has its own set of required fields and optional fields. The exact list can vary depending on your admin portal's configuration
To see the complete set of allowable fields for your organization:
- Open the Student Import dialog.
- Expand Option 2 (“Use Your Own File”).
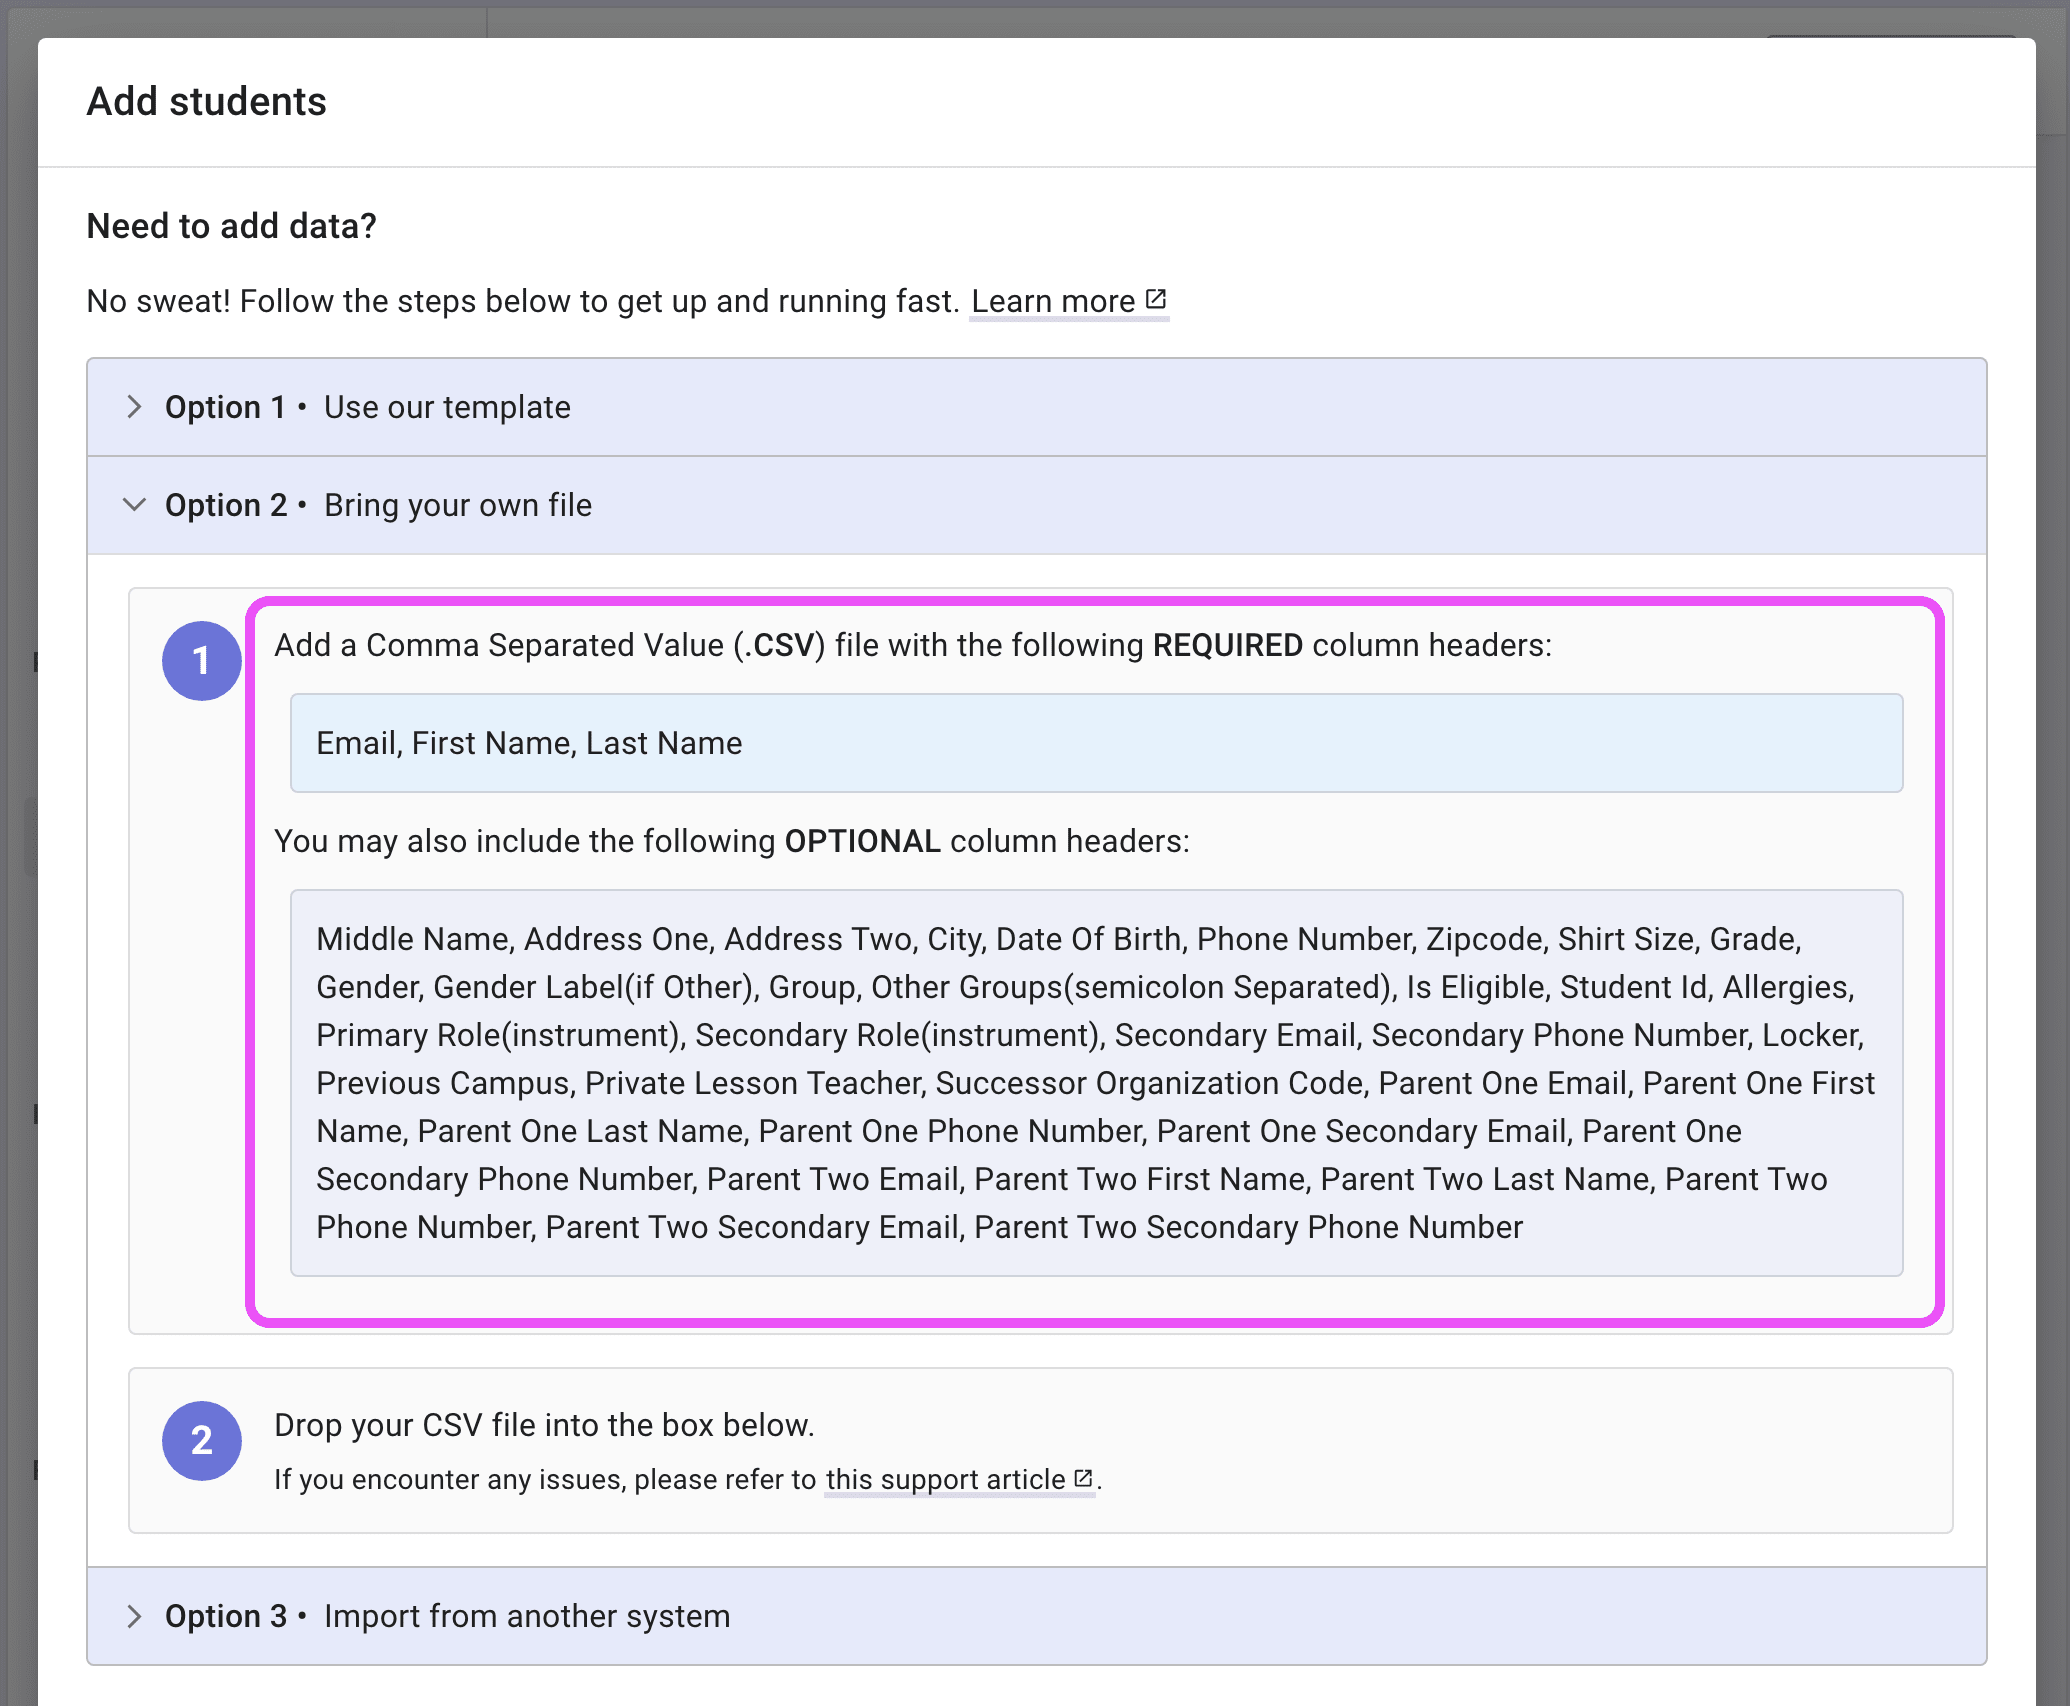
This view lists every column header your file can include — exactly the headers that Presto accepts during import. If your district uses Dynamic Fields, those will appear here as well, each with the data type chosen by your portal administrators.
Student Data Types - Required
These columns must be included in your CSV for Presto to create student records correctly.- Email — student email address
- Must be a valid email address
- Recommended: use the school district student email address
- First Name — student first name
- Text. Minimum length: 2 characters, maximum length: 50 characters
- Last Name — student last name
- Text. Minimum length: 2 characters, maximum length: 50 characters
Student Data Types - Optional
These columns are optional but can be included to capture extra student details.- Middle Name
- Text. Minimum length: 2 characters, maximum length: 50 characters
- Address One
- Address Two
- Text. Minimum length: 2 characters, maximum length: 50 characters
- City
- Text. Minimum length: 2 characters, maximum length: 50 characters
- Date Of Birth
- Date formatted like MM/DD/YYYY or M/D/YYYY, e.g. 01/01/1999
- Students must be at least 4 years old
- Phone Number — student phone number
- 10 digits for a US phone number — without the country code — formatting optional
- Zipcode
- 5-digits like 75044 or ZIP+4 like 75044-1234
- Shirt Size
- One of the following values: YXS, YS, YM, YL, YXL, XS, S, M, L, XL, XXL, XXXL, XXXXL
- Grade
- One of the grades allowed for your organization level:
- Elementary: K-6
- Middle School: 5-8
- High School: 8-12
- College/University: Freshman, Sophomore, Junior, Senior, Graduate Student
- Expanded License: K-12
- One of the grades allowed for your organization level:
- Gender
- One of the following values: male, female, other, prefer not to answer
- Gender Label (if Other)
- Text
- only allowed if “Gender” is “other”
- Group
- The name of an existing group in your organization
- Other Groups (semicolon Separated)
- Names of existing groups in your organization, separated with a semicolon:
- e.g., 1st Period; Spring Trip
- Names of existing groups in your organization, separated with a semicolon:
- Is Eligible
- True/False
- Student Id
- Text
- Allergies
- Text. Minimum length: 1000 characters
- Primary Role (instrument)
- One of roles listed in the import dialog in the “Role/Instrument” area, which will include custom roles created for your organization
- Secondary Role (instrument)
- One of roles listed in the import dialog in the “Role/Instrument” area, which will include custom roles created for your organization
- Secondary Email
- Must be a valid email address
- Secondary Phone Number — student secondary phone number
- 10 digits for a US phone number — without the country code — formatting optional
- Locker
- Text. Minimum length: 2 characters, maximum length: 50 characters
- Previous Campus
- Text
- Private Lesson Teacher
- Text. Minimum length: 2 characters, maximum length: 255 characters
- Successor Organization Code — which organization the student will go to after “graduating” from your organization
- Code for another organization in the Presto system, e.g. prestohsband
- Successor Organization Code will only appear if there is more than one organization in your district.
Tip
When parent information is included in the CSV, Presto automatically creates Adult accounts for each parent and links them to the associated student as a Family. This ensures that parents can access their student’s information in Presto without needing to create separate accounts manually.
- Parent One Email
- Must be a valid email address
- Parent One First Name
- Text. Minimum length: 2 characters, maximum length: 50 characters
- Parent One Last Name
- Text. Minimum length: 2 characters, maximum length: 50 characters
- Parent One Phone Number
- 10 digits for a US phone number — without the country code — formatting optional
- Parent One Secondary Email
- Must be a valid email address
- Parent One Secondary Phone Number
- 10 digits for a US phone number — without the country code — formatting optional
- Parent Two Email
- Must be a valid email address
- Parent Two First Name
- Parent Two Last Name
- Text. Minimum length: 2 characters, maximum length: 50 characters
- Parent Two Phone Number
- 10 digits for a US phone number — without the country code — formatting optional
- Parent Two Secondary Email
- Must be a valid email address
- Parent Two Secondary Phone Number
- 10 digits for a US phone number — without the country code — formatting optional
Dynamic Field Data Types
Since the Dynamic Fields in Presto Assistant can vary, check with your Admin Portal administrators about which fields use which type in your Admin Portal. Your Settings page shows a list of Administrators and Admin Assistants and their email addresses.
Types for Dynamic Fields can be any of the following:
- Text
- Number
- True/False
- Date
Things to keep in mind #
- Instead of adding “test data”, please use real data. Presto Assistant never really deletes any data, and using your real data will keep things cleaner for you later on. You probably don’t want to see “Test Student - test@student.com” in your data. Also, your program numbers will be wrong if you add fake data.
- When importing Student data, keep in mind that all individual Presto Assistant users must have a separate email address. Students and parents cannot share an email address. In that regard Presto behaves like most other web applications in the modern era.
- If your school district has an email system set up, we suggest using that email for students in Presto Assistant.
Troubleshooting #
- If you see an alert that says some rows have invalid data, press the "SHOW" button to see the rows that have issues.
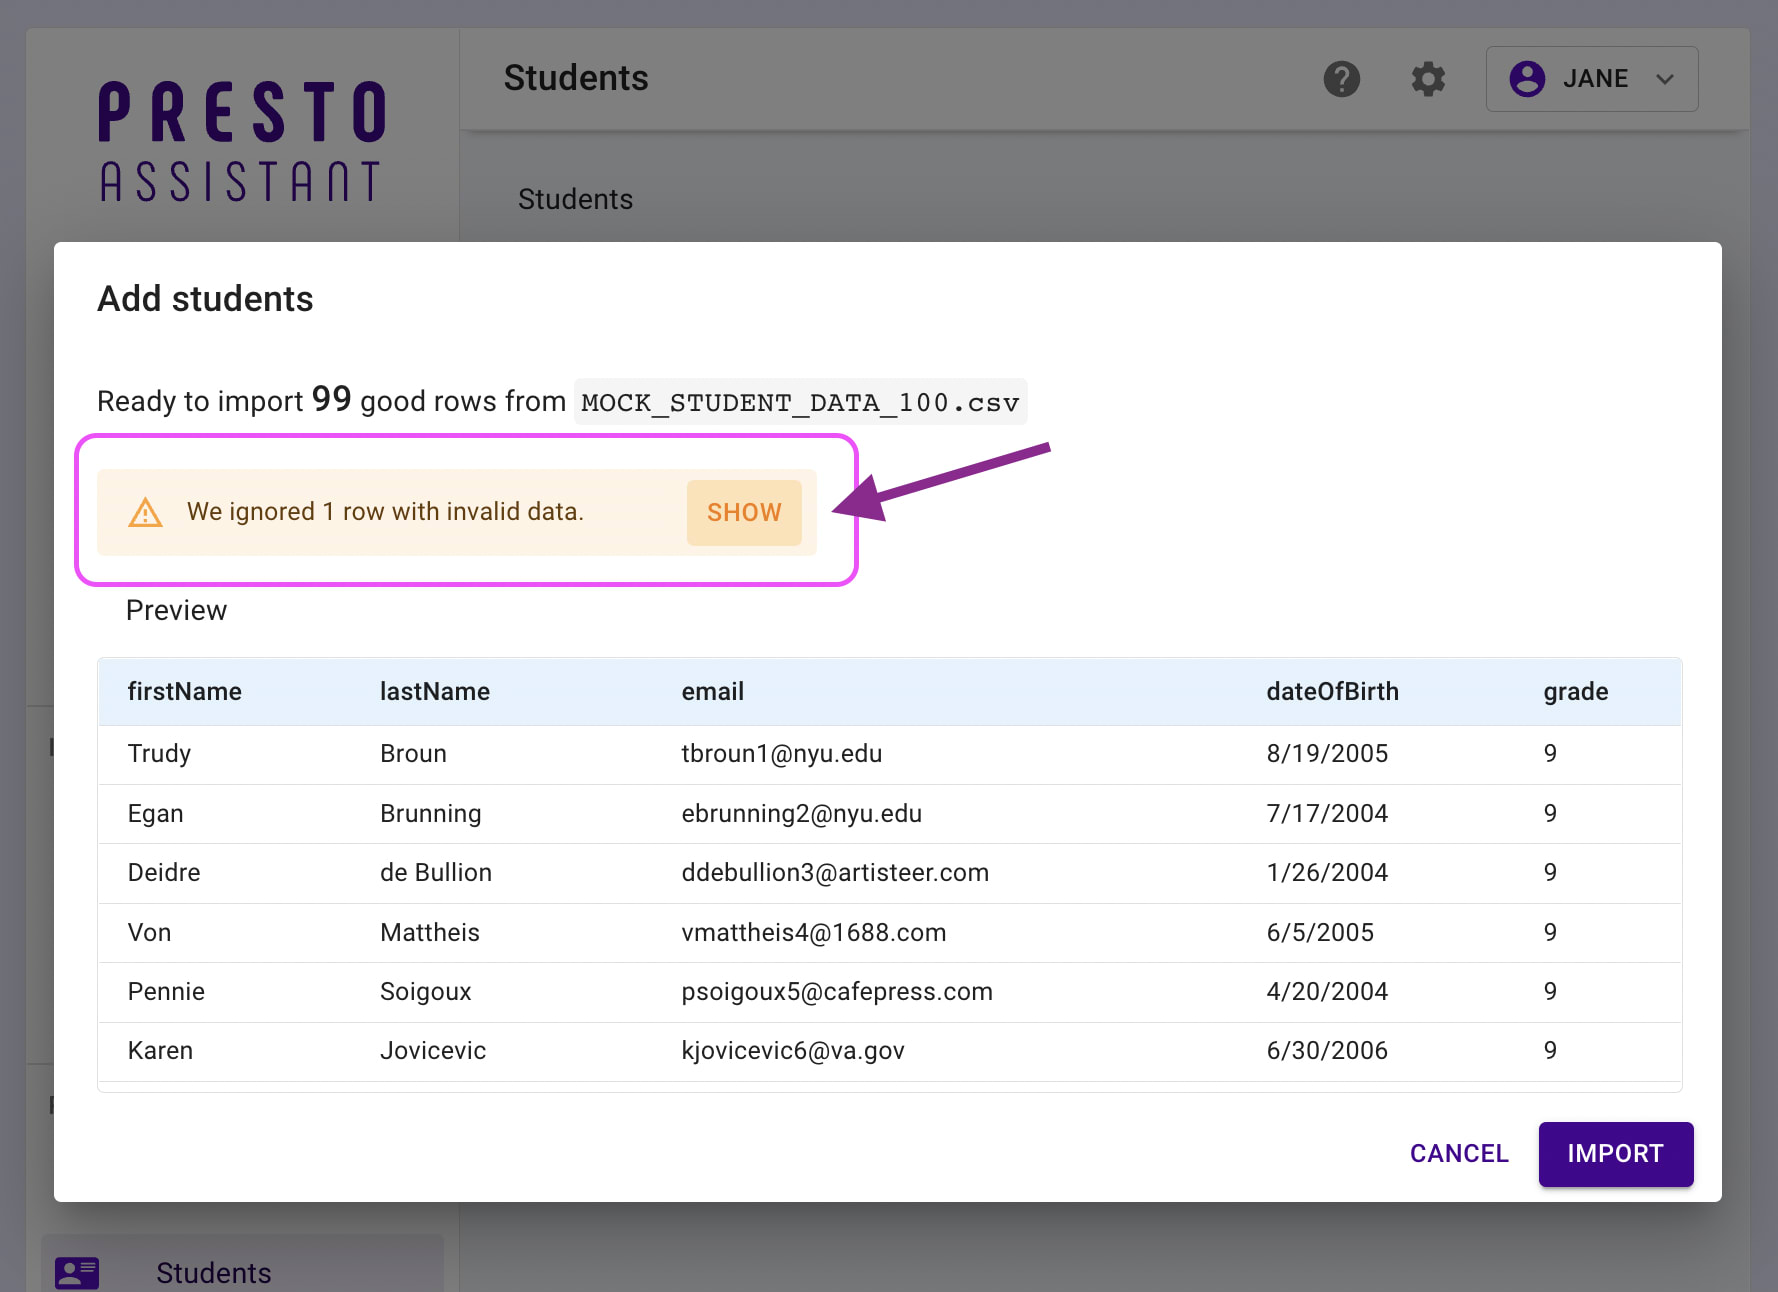
- All rows with invalid data will show the row number in your file and which issues to fix for data in that row.
- You can choose to import all good data right now and come back to fix the issues later.
- If you fix the issues right now, hit the Cancel button to restart the import process for new student data.

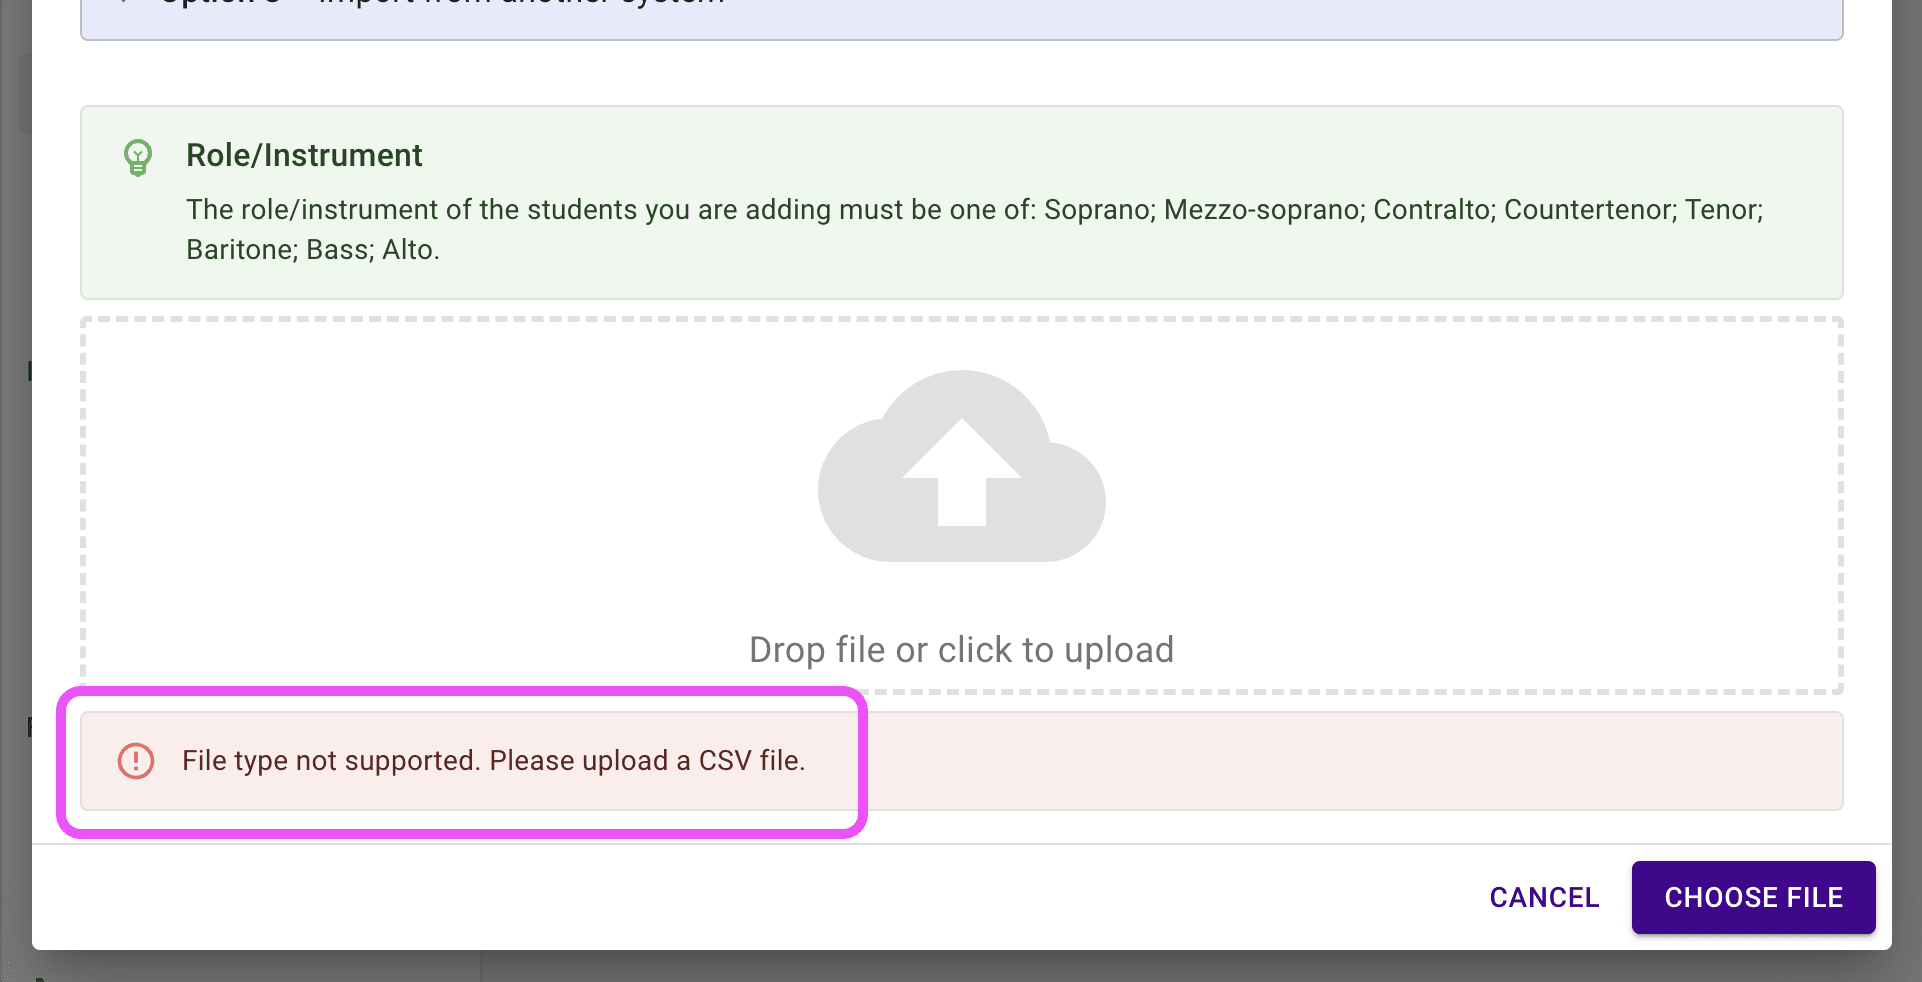
- If you attempt to add a file that is not a CSV file, you will see an error message. Make sure you are importing a CSV file.
Did you know? #
All parts of Presto Assistant that support importing data work the same way. We aim to keep it simple.